<?xml version="1.0" encoding="utf-8"?><feed xmlns="http://www.w3.org/2005/Atom"><title/><link href="http://blog.koenig.diy/atom.xml" rel="self" type="application/atom+xml"/><link href="http://blog.koenig.diy/" rel="alternate" type="text/html"/><id>http://blog.koenig.diy/atom.xml</id><updated>2025-01-02T16:45:00+02:00</updated><entry><title>Bashify your DevOps</title><link href="http://blog.koenig.diy/bashify_devops/" rel="alternate" type="text/html"/><id>http://blog.koenig.diy/bashify_devops/</id><published>2025-01-02T16:45:00+02:00</published><updated>2025-01-02T16:45:00+02:00</updated><content type="html"><p>In the quest for efficient homelab maintenance, I found myself navigating a maze of automation tools, from Ansible to Chef, each promising streamlined management and ease of use. However, what I encountered instead were frequent headaches and endless debug sessions, particularly with Ansible, which seemed to thrive on Python dependency issues that often derailed my efforts. Frustrated by the complexity and overhead of these solutions for my relatively simple local setup, I decided to take matters into my own hands. This led me to the realization that sometimes, the best approach is to strip away the layers of abstraction and craft a custom solution tailored to my needs—enter my own bash script system. In this blog post, I’ll share my journey from convoluted automation frameworks to the simplicity and effectiveness of scripting, and how it transformed my homelab experience.</p><p><em>Thank you<a href="https://duckduckgo.com/chat" target="_blank" rel="noopener">DuckDuckGo AI</a>
for providing this great introduction!</em></p><p>Basically, the whole thing got the Jist. If continiously had issues with python dependencies and Ansible, especially if the Linux distributions upgraded their provided python versions and therefore things crashed. Since i actually do mostly simple stuff like a good ol<code>apt-get upgrade</code>, and all my systems are Linux systems, I decided that I will go with the most basic effort thats possible.</p><p><strong>I&rsquo;m very aware, that in very very large professional environments, this might not be the right things to do. Especially, if you&rsquo;re not just focussing on one OS(Linux) and one distribution(Ubuntu).</strong></p><p>To mention this upfront, my homelab is not my<a href="http://blog.koenig.diy/reducing_complexity_ha" data-rel="prefetch">home automation</a>
which is by now just a HomeAssistant running on a Raspberry Pi.</p><p>My homelab consists of two ProxMox servers (Minisforum and a ThinkCenter). This homelab hosts some general services I sometimes use more or less. To save power on this, the Homelab has some scheduled availability times:</p><ul><li>from 03:00 to 04:00 both systems are online for backups. Also, my Mac Devices use the HomeLabs OpenMediaVault as a TimeMachine backup resource.</li><li>from 16:00 to 22:00, where I&rsquo;m usually at home and want to use the NextCloud or other services. Therefore, only the ThinkCentre is running here.</li></ul><p>To manage this, I taught my 24/7 Raspberry Pi to boot and shutdown both machines via Wake-on-LAN.</p><p>So what do I want to happen:</p><ul><li>scheduled package upgrades once a week, even if my homelab is offline</li><li>scheduled backups of all systems once a week</li><li>email, when something goes wrong</li></ul><p>The process, is the following:</p><ul><li>Every wednesday at 02:50, the homeautomation Raspberry boots the MinisForum backup machine and the ThinkCentre, if they are not online</li><li>On the MinisForum machine, a VM &ldquo;maintenance&rdquo; with a bunch of scripts will boot</li><li>at 03:00, the maintenance machines<code>cron</code> jobs will start a<a href="https://gitlab.com/tsmt/homelab_devops" target="_blank" rel="noopener">maintenance script</a>
. I made this script publicly available. See on gitlab, how it exactly works.</li><li>If the script fails for some reason, an<strong>Email</strong> will be sent to my private mail addres with the fail logs attached. This is done with the<code>mutt</code> program on linux. To do this, I use the SMTP of my own mail provider.</li></ul><p>This system is not much, but it&rsquo;s now capable of doing everything that was possible before my<a href="http://blog.koenig.diy/reducing_complexity_ha" data-rel="prefetch">home automation reduction journey</a>
. I&rsquo;m not a big expert of bash scripts since I&rsquo;m professionally a Developer, not a DevOps person, but I was able to write a well extendable library of bash scripts in<strong>not even a whole working day</strong>. Let&rsquo;s see, how reliable it is. At least also here, I removed a lot of software from my stack.</p><h3 id="before">Before<a class="heading-anchor" href="#before" aria-hidden="true">#</a></h3><ul><li>Linux</li><li>Bash</li><li>Ansible + dependencies</li><li>Python (used by ansible) + dependencies</li><li>Ansible Tower as UI (with all it&rsquo;s dependencies)</li><li>NodeRED with Telegram + Email to send alerts</li></ul><h3 id="now">Now<a class="heading-anchor" href="#now" aria-hidden="true">#</a></h3><ul><li>Linux</li><li>Bash</li><li>cron</li><li>mutt</li></ul><p>Where &ldquo;mutt&rdquo; is even the only thing that needs to be installed after creating a new machine.</p><p>I think I was very successful with this, and it actually makes me happy to see how simple some things can be.</p><p>Links:</p><ul><li><a href="https://gitlab.com/tsmt/homelab_devops" target="_blank" rel="noopener">My HA maintenance scripts Repo on GitLab</a></li><li><a href="http://blog.koenig.diy/reducing_complexity_ha" data-rel="prefetch">My home automation reduction journey</a></li></ul></content></entry><entry><title>Radical reduction - my homeautomation journey</title><link href="http://blog.koenig.diy/reducing_complexity_ha/" rel="alternate" type="text/html"/><id>http://blog.koenig.diy/reducing_complexity_ha/</id><published>2024-08-02T18:00:00+02:00</published><updated>2024-08-02T18:00:00+02:00</updated><content type="html"><p>For some years, I have a homeautomation running in my apartment. I did not extend it over time by a lot, but I like to have reliable, low maintenance services, especially about temperature regulation and lighting. This is a story of radical reduction. I basically went from left to right in 5 hours (<em>there are zoom-in pictures in the following article</em>):</p><p><figure><img src="/reducing_complexity_ha/main.png" width="2716" height="894" srcset="/reducing_complexity_ha/main_hu_305931fcabef1312.png 480w, /reducing_complexity_ha/main_hu_d6a2901b54f1c23a.png 1024w" loading="lazy" alt="The progress"/></figure></p><h2 id="how-did-this-even-happen">How did this even happen?<a class="heading-anchor" href="#how-did-this-even-happen" aria-hidden="true">#</a></h2><p>Feature bleed. My home automation had those features:</p><ul><li>Heating thermostates (MAX) in every room</li><li>Window sensors (HomeMatic) on most windows</li><li>Temperature/Humidity sensors (Zigbee) in every room</li><li>Some controllable power plugs (Zigbee)</li><li>LED strips in office and living room</li><li>ProxMox Virtualization Server (<em>this is not permanently running, so it&rsquo;s not able to run the homeautomation, but HA is controlling when it starts and stops automatically</em>)</li></ul><p>This doesn&rsquo;t sound a lot, but it was.</p><p>This system evolved over time. I started with MAX Themostates and Homematic window sensors, which I connected to a Raspberry PI using a<a href="https://blog.loetzimmer.de/2017/10/max-cube-umbau-zu-4-fach-netzwerk-cul.html" target="_blank" rel="noopener">custom flashed Max CubeCUL (german link)</a>
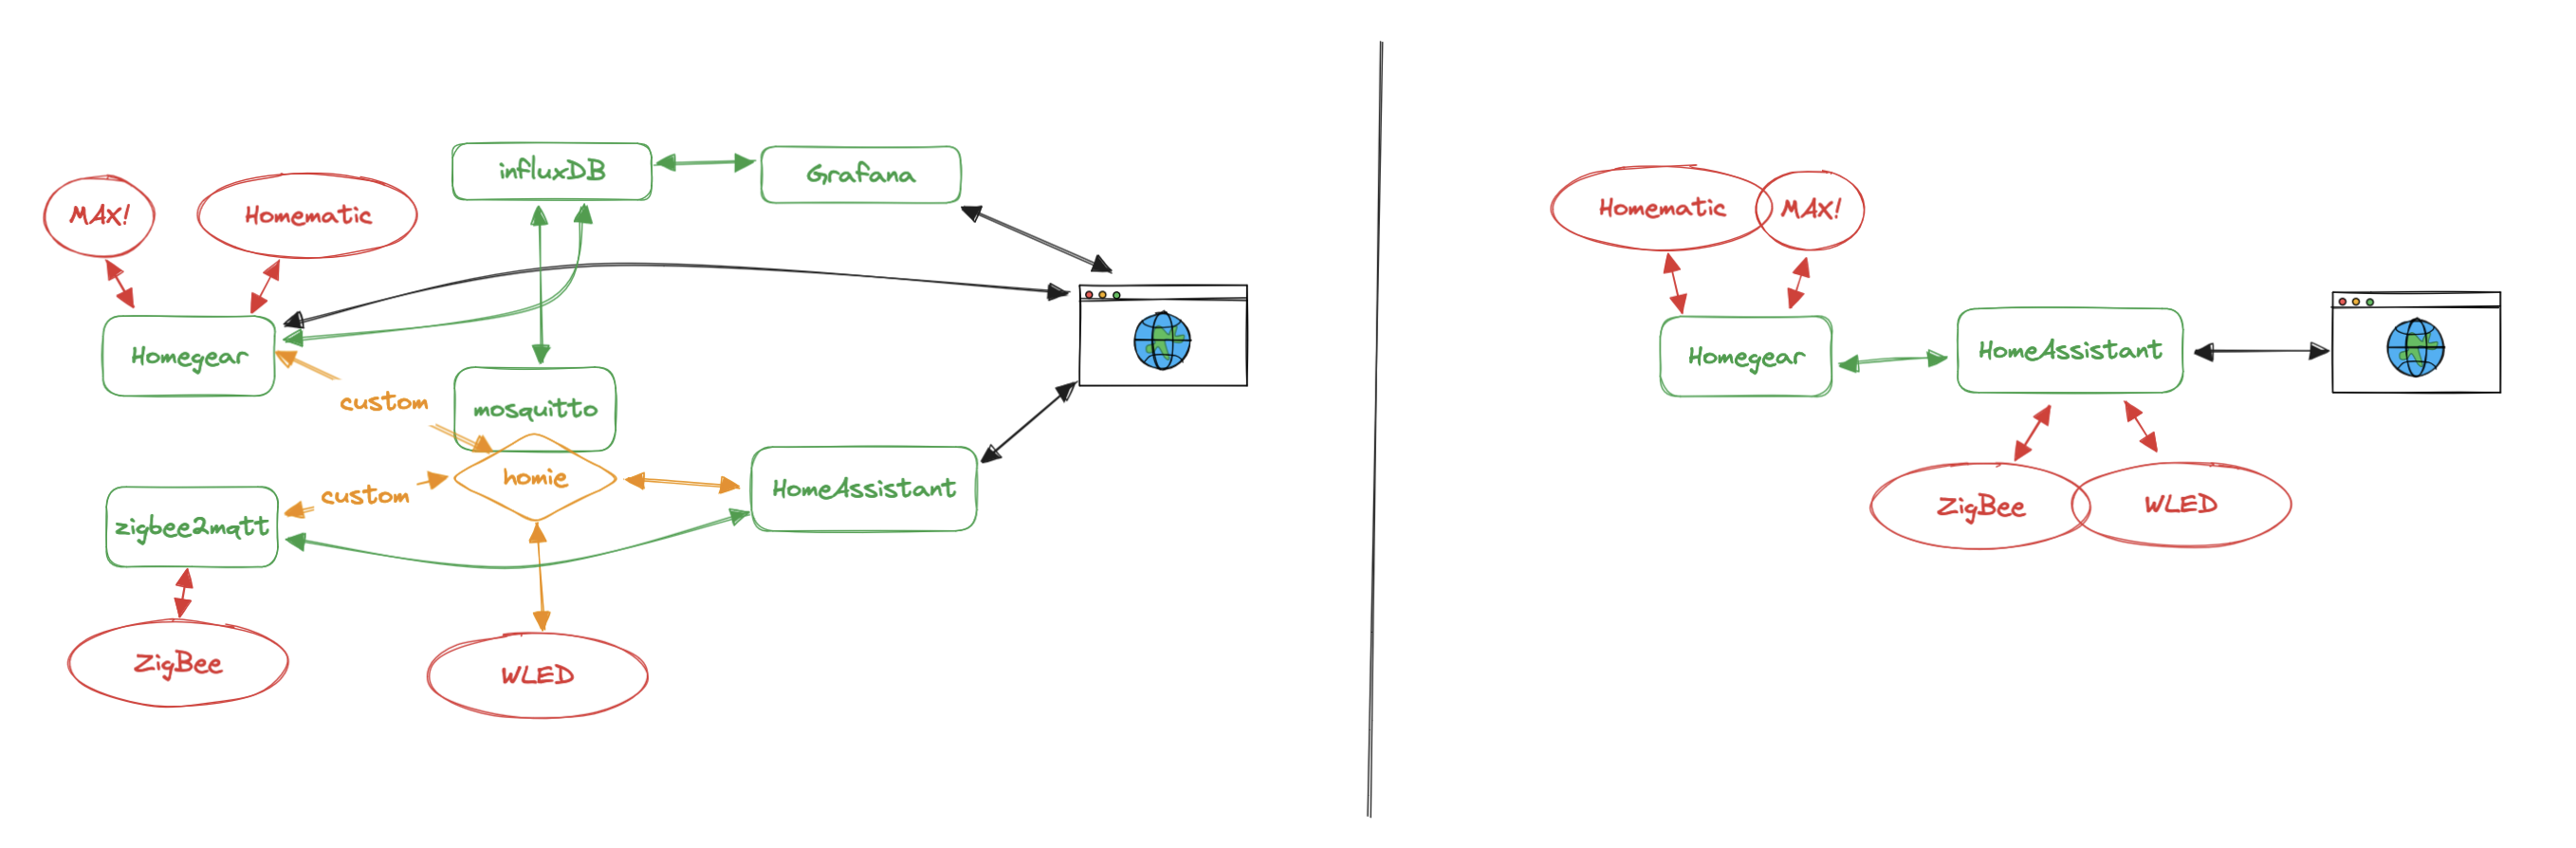
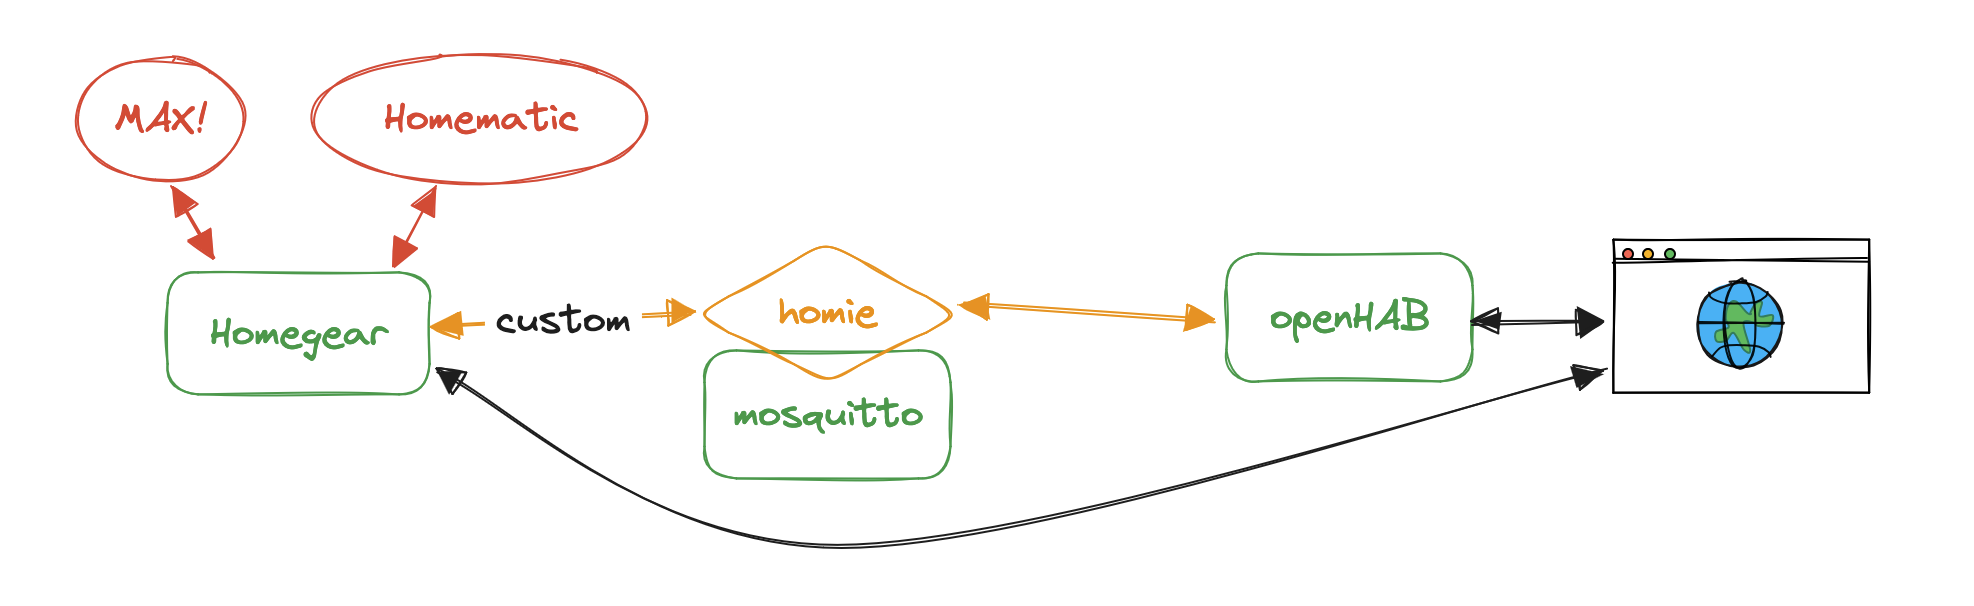
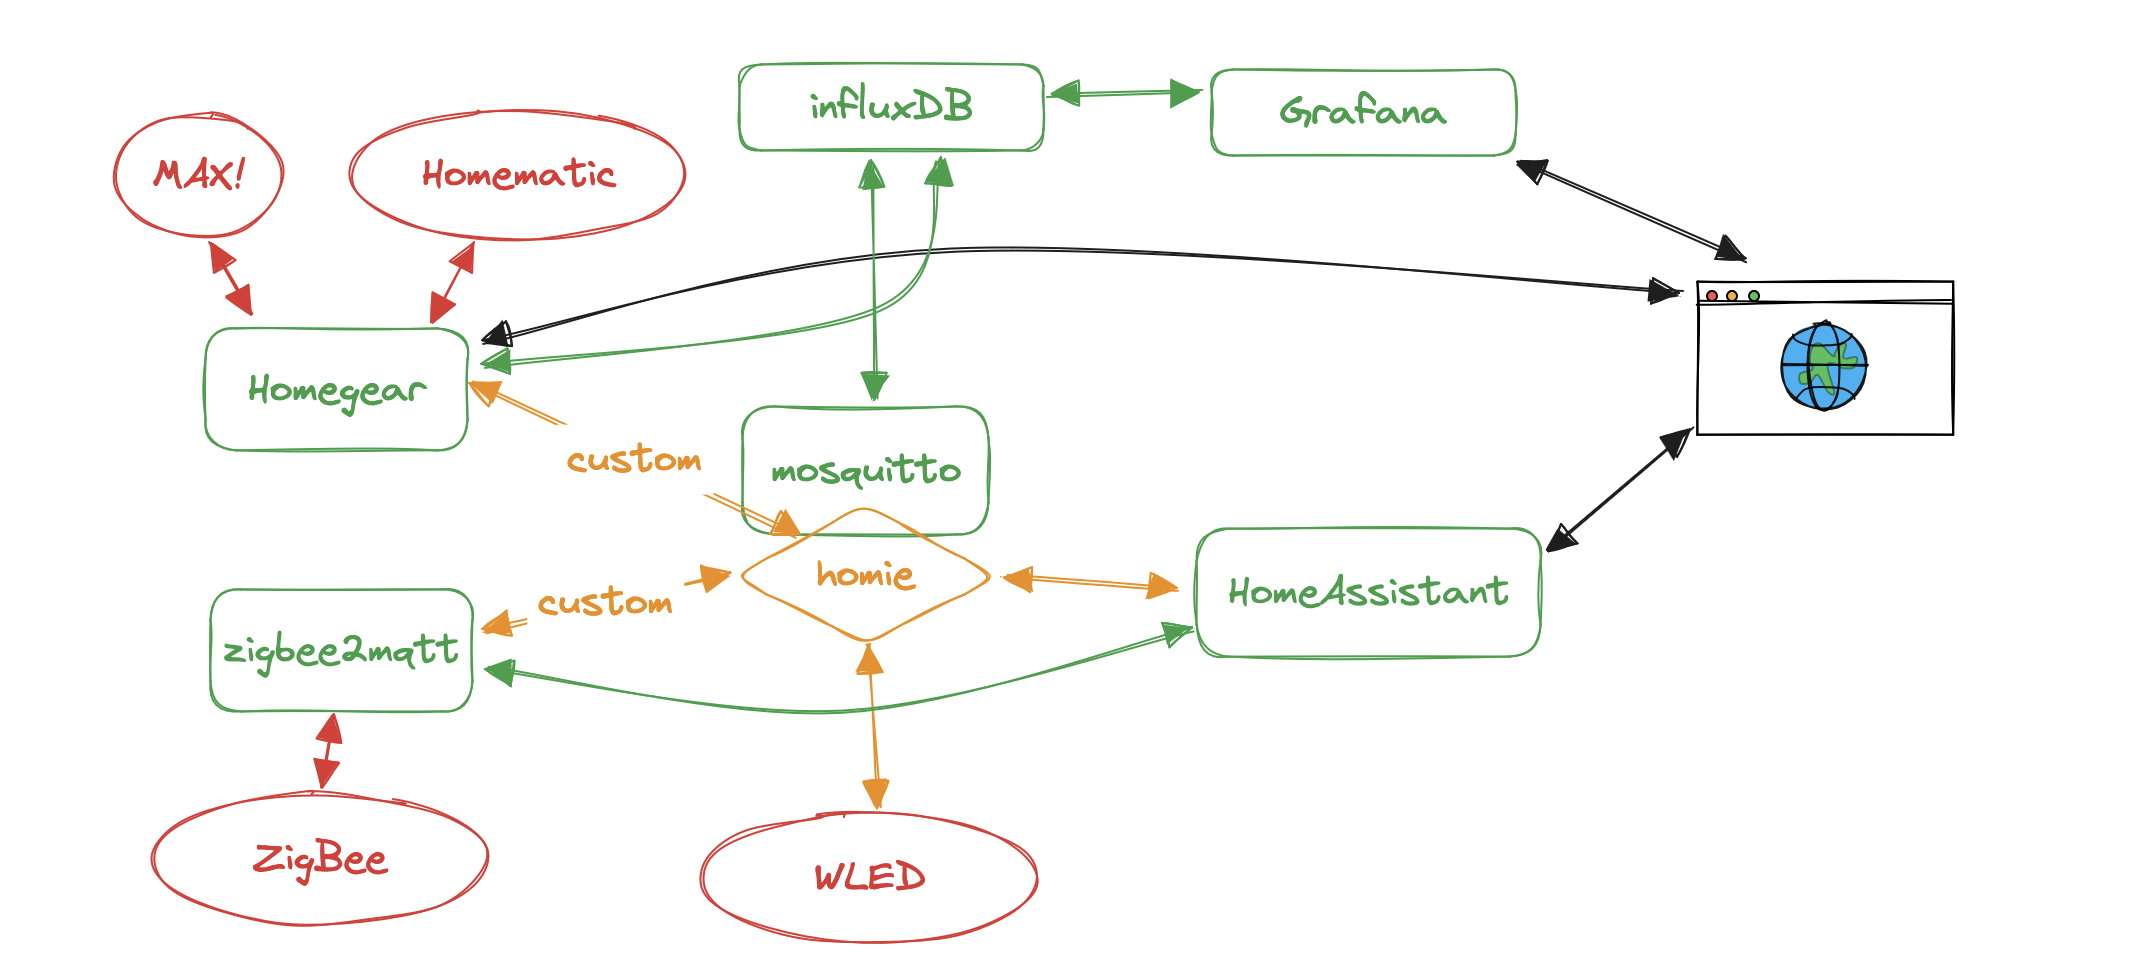
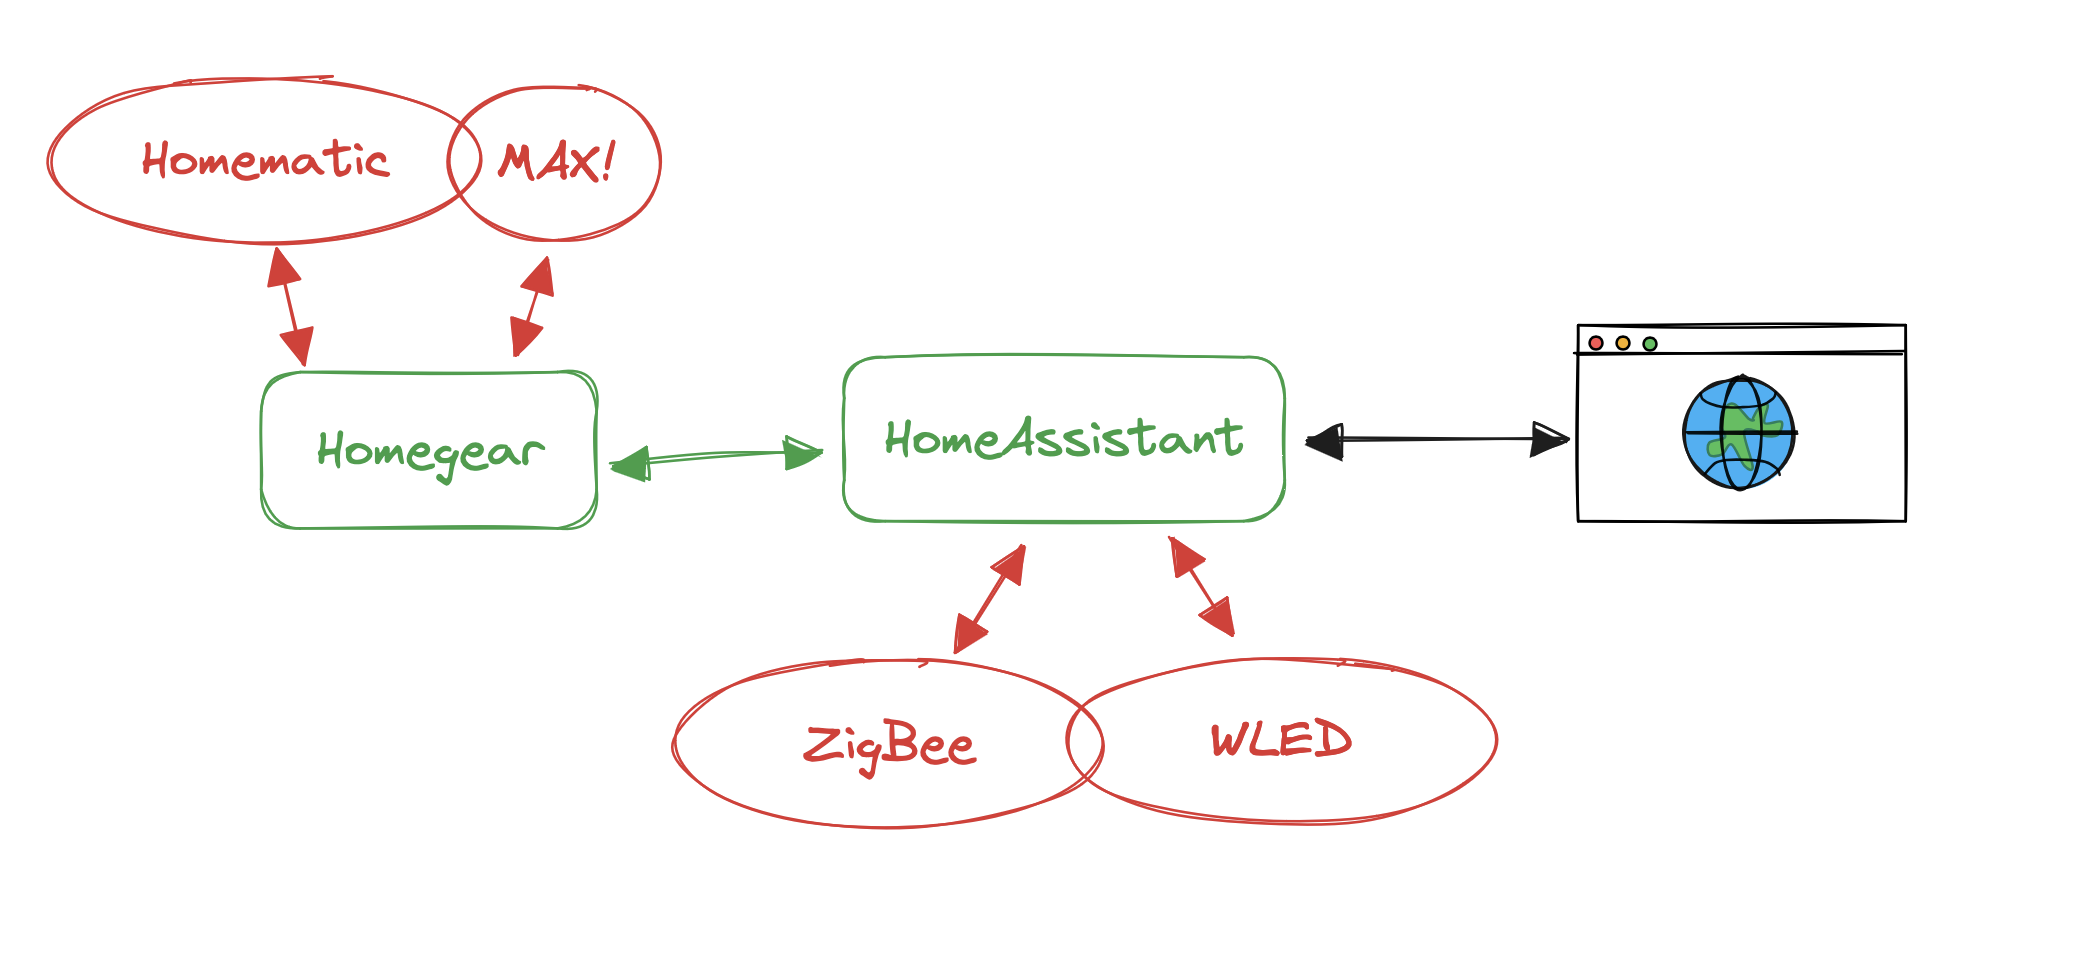
and<a href="https://shop.codm.de/automation/Homegear/3/cc1101-raspberry-pi-spi-modul-v0.4" target="_blank" rel="noopener">cod.m&rsquo;s CC1101 Raspberry Module</a>
, and<a href="https://Homegear.eu" target="_blank" rel="noopener">Homegear</a>
installed on Raspbian.</p><p>For UI, I installed (openHAB)[https://www.openhab.org/].</p><p>To connect openHAB and Homegear, I implemented a Flow in Homegears internal NodeRED - which is called NodeBLUE - to custom map my thermostates to<a href="https://homieiot.github.io/specification" target="_blank" rel="noopener">&ldquo;homie&rdquo;-mqtt standard</a>
, because openHAB is able to autodetect Homie devices via MQTT.</p><p>So I needed an additional MQTT broker - mosquitto. The System was the following:</p><ul><li>Software (running on raspberry pi)<ul><li>Homegear (incl NodeBLUE flows)</li><li>OpenHAB for visualization</li><li>mosquitto as MQTT broker</li></ul></li><li>Custom Protocols<ul><li>&ldquo;homie&rdquo; thermostates mapped in MQTT</li><li>&ldquo;homie&rdquo; window sensors mapped in MQTT</li></ul></li></ul><p>This was around 2020, the first stage.<figure><img src="/reducing_complexity_ha/stage_one.png" width="1974" height="606" srcset="/reducing_complexity_ha/stage_one_hu_25c2f6a7f8e1cb0a.png 480w, /reducing_complexity_ha/stage_one_hu_62291ff050f6a131.png 1024w" loading="lazy" alt="First stage of Automation"/></figure></p><p>From here, the system grew quite big over time. Since I don&rsquo;t want to elaborate each point with a own paragraph, I will just jot it down using bulletins:</p><ul><li>In 2020, I added 2 WLED striped in office and living room. Those stripes are connected to openHAB using custom MQTT homie integrations with NodeBLUE (Homegear) again&hellip;</li><li>In 2021, I started adding Zigbee Devices. For that, I used cod.m&rsquo;s great<a href="https://shop.codm.de/automation/zigbee/33/zigbee-cc2652p2-raspberry-pi-module" target="_blank" rel="noopener">Raspberry Pi Module</a>
(link to newer version). I installed Zigbee2MQTT, attached it to my mosquitto instance and built - again - custom homie mappings.</li><li>Same year, I added Grafana for Monitoring and InfluxDB as da Database.</li><li>Also same year, I tried to upgrade openHAB and had a unrecoverable error. Or, let&rsquo;s say it like that - I&rsquo;m usually willing to spend some time fixing broken things, but if a re-setup seems to be faster, I will do that. So I ended up<strong>switching openHAB to HomeAssistant</strong>.</li></ul><p>This system remained like this for long time, because I was severly annoyed by it&rsquo;s complexity and didn&rsquo;t want to touch it at all. Actually, in the occasions I tried to do something with it - for example updating the software components or Raspbian - I constantly broke the system. After a while, I just had absolutely no energy for it. It looked somehow like this (all running on a raspberry pi):</p><p><figure><img src="/reducing_complexity_ha/stage_two.png" width="2140" height="976" srcset="/reducing_complexity_ha/stage_two_hu_73739261f8b22c60.png 480w, /reducing_complexity_ha/stage_two_hu_f19782e91ef5262c.png 1024w" loading="lazy" alt="Second stage of Automation"/></figure></p><p>As you can see in the summary, this is just a grown system where you attach things one-by-one until you have an annoying monster. I have enough of this at work, but I don&rsquo;t want to have that in my appartment. So you see, feature and complexity bleed is even happning in just a very simple home automation.</p><h2 id="the-big-reduction">The big reduction<a class="heading-anchor" href="#the-big-reduction" aria-hidden="true">#</a></h2><p>When I introduced my homelab server this year, I moved HomeAssistant from the Pi to the homelab server. But I recognised that the server does absolutely not need to run 24/7 and actually consumes a lot more power compared to the raspberry pi 4 which runs the home automation - actually 10W compared to 4W (which is both perfecly fine - but we all try to save energy right). So I wanted to have scheduled boots and shutdowns for my homelab, but also have the HomeAssistant UI available all the time.<strong>This means, move HomeAssistant back to the raspberry pi</strong>.</p><p>At the same moment, I decided to update the OS, and all other software which&hellip;</p><p><figure><img src="/reducing_complexity_ha/fine.jpg" width="561" height="265" srcset="/reducing_complexity_ha/fine_hu_a5b0eb68e1224788.jpg 480w, /reducing_complexity_ha/fine_hu_6fe82fd7cbbf0960.jpg 561w" loading="lazy" alt="lolmeme"/></figure></p><p><strong>obviously completely messed up my installation</strong>, especially Homegear. I spend 5-6 hours trying to fix everything, but as I mentioned earlier I&rsquo;m usually not very eager to throw away stuff and do a clean sheet installation.</p><h3 id="starting-from-scratch-on-the-raspberry">Starting from scratch on the Raspberry<a class="heading-anchor" href="#starting-from-scratch-on-the-raspberry" aria-hidden="true">#</a></h3><p>At this point, I wanted to do things very differently and use as little software as possible, so I don&rsquo;t run into problems when updating the components. Let it be Homegear, zigbee2mqtt, HomeAssistant, grafana or influx, in the last years I had issues with each of them during software updates. Not to speak of raspbian itself. It might be due to the fact that I do not update very often and if so, I instantly jump multiple versions. So my goals for the new system were the following:</p><ul><li>Have automated updates (<em>not yet done</em>)</li><li>Have a good backup mechanism (done)</li><li>Use very little software, and as much &ldquo;native software&rdquo; as possible.</li></ul><p>Since I wanted to keep the sheets clean in Raspbian, I decided not to install software via apk, but use docker and docker-compose instead to manage the actual automation system in a reproducable way. The docker compose project is<a href="https://github.com/tsmt09/homeautomation" target="_blank" rel="noopener">available at my github account</a>
.</p><p>Outside of docker, I only want to have the backup system and the operation system running.</p><p>The backups problem I solved by<a href="https://github.com/tsmt09/homeautomation/blob/main/backup.sh" target="_blank" rel="noopener">just using a shell script</a>
which does a gzipped tar backup of the whole docker-compose project folder, including all configurations which are mounted into the containers. This backup is triggered by a cronjob once a day. On my Macbook, I also run a cronjob every hour to check if there are new backups via ssh and save them to my local disk. To me, this sounded as the most straight forward and easiest solution, utilizing long proven software.</p><p>In the end, this means that in case of a reinstallation I just need to</p><ul><li>change 2 files in /boot to make my raspbian able to use the connected hardware. Those are even in the Git Repo.</li><li>install docker</li><li>git clone, restore backup and docker-compose up</li></ul><p>to make the whole system work.</p><h3 id="homeautomation">Homeautomation<a class="heading-anchor" href="#homeautomation" aria-hidden="true">#</a></h3><p><figure><img src="/reducing_complexity_ha/stage_three.png" width="2080" height="954" srcset="/reducing_complexity_ha/stage_three_hu_eecd9f8073ec4ff7.png 480w, /reducing_complexity_ha/stage_three_hu_7c47bd06bd810889.png 1024w" loading="lazy" alt="The Solution"/></figure></p><p>I just ended up with two containers are are part of the docker-compose file, and I will try as good as possible to keep it like that.</p><p>Homegear, I again use to connect to my MAX Thermostates using a CUL Cube and to my Homematic window sensors using the mentioned MAX CubeCUL and<a href="https://shop.codm.de/automation/Homegear/3/cc1101-raspberry-pi-spi-modul-v0.4" target="_blank" rel="noopener">CC1101 Module</a>
. AFAIK, HomeAssistant is not capable of utilizing the Cube so I basically just did the very basic setup and paired all the devices to Homegear, and then connected Homegear to HomeAssistant since it can act like a normal Homematic CCU.</p><p><em>Btw, do you recognize that too many products in Homeautomation start with Home? This get&rsquo;s really confusing by now.</em></p><p>HomeAssistant will be the main driver of my automation from now on, and to me this feels very well. I was actually surprised how much of my old implementations can be covered by HomeAssistant by now.</p><p><strong>What it has done for me</strong>:</p><ul><li>Completey<strong>get rid of MQTT and homie custom integrations</strong> (this is the best part):<ul><li>Control MAX Thermostates via Homegear CCU</li><li>Monitor Homematic window sensors via Homegear CCU</li><li>Covers all my Zigbee Actor and Sensor Hardware (weather sensors, power plugs, window sensors, routers) via Zigbee Integration and the mentioned<a href="https://shop.codm.de/automation/zigbee/33/zigbee-cc2652p2-raspberry-pi-module" target="_blank" rel="noopener">cod.m Raspberry Pi Module</a>
,<strong>so I can get rid of zigbee2mqtt</strong>.</li><li>Can natively connect to WLED for my lighting</li></ul></li><li><strong>Get rid of Influx+Grafana</strong><ul><li>Can monitor all Sensors and Actors (Entities)</li><li>Can monitor information about host system and docker containers</li><li>Collects statistics and histories</li><li>Can show this as a graph</li></ul></li><li>Can still do all automations I implemented with NodeRED/NodeBLUE natively (see below). Even though I have to mention that I particularly don&rsquo;t like the automation flow of HomeAssistant yet. But I will try and see if I can get used to it.</li><li>Automations I have been able to quickly implement yet:<ul><li>Disable heating if windows are open</li><li>Shutdown homelab at 2am if no tasks are running (check by system load)</li><li>Wake-On-LAN homelab at 5:30pm (when I usually come home)</li></ul></li></ul><h2 id="summary">Summary<a class="heading-anchor" href="#summary" aria-hidden="true">#</a></h2><p>I&rsquo;m very happy with the last few days. I was able to drastically strip down my homeautomation they way I would like it to be. While doing this, I actually realized how this system was stressing me out. I was able to implement all automations I had before, use a lot less software and build a more robust backup and config management system at the same time.</p></content></entry><entry><title>Chat for my async-rust demo</title><link href="http://blog.koenig.diy/async_demo_chat/" rel="alternate" type="text/html"/><id>http://blog.koenig.diy/async_demo_chat/</id><published>2024-07-26T22:13:00+02:00</published><updated>2024-07-26T22:13:00+02:00</updated><content type="html"><p>Today I had the idea to extend my<a href="https://github.com/tsmt09/tokio-web-demo" target="_blank" rel="noopener">async rust webserver demo</a>
with an additional feature of a chat. In this small post I want to discuss why I think a chat functionality is a useful showcase for a rust webserver, but also show how I did implement it, since it&rsquo;s a very easy feature to develop using the tokio runtime.</p><p>You can easily try it out on your machine by downloading the<code>docker-compose.yaml</code> (<a href="https://raw.githubusercontent.com/tsmt09/tokio-web-demo/main/docker-compose.yaml" target="_blank" rel="noopener">right click + save</a>
), store it in a folder called<code>tokio-web-demo</code> and typing<code>docker compose up</code> in your terminal. Make sure you navigate to your created folder first. You can find the webserver at<code>http://localhost:8123</code>.</p><video src="2024-07-26_chat.webm" width="100%" height="100%" autoplay= loop=>
Your browser does not support the video tag.</video><h2 id="why">Why<a class="heading-anchor" href="#why" aria-hidden="true">#</a></h2><p>A chat functionality serves as an excellent showcase for a Rust webserver because it utilizes different I/O patterns, which include sockets, locks, and broadcast channels. This variety of I/O patterns demonstrates the versatility and capabilities of the webserver in handling various types of data communication and synchronization.
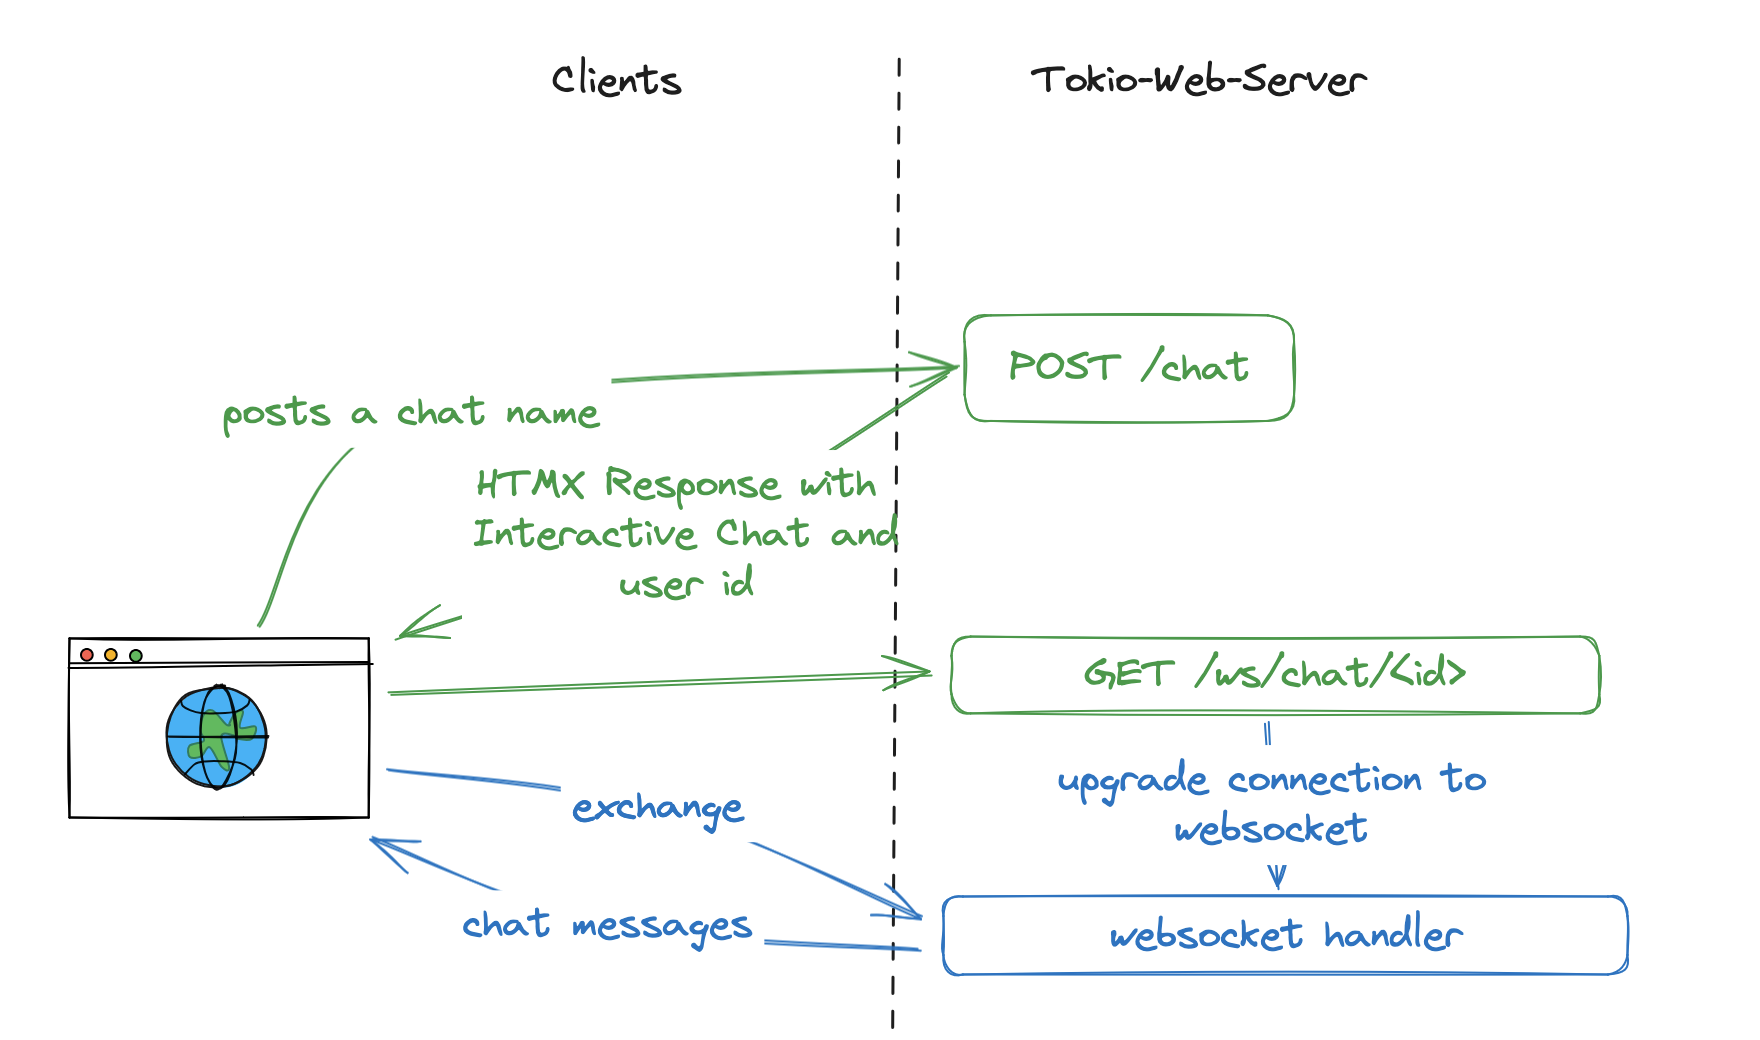
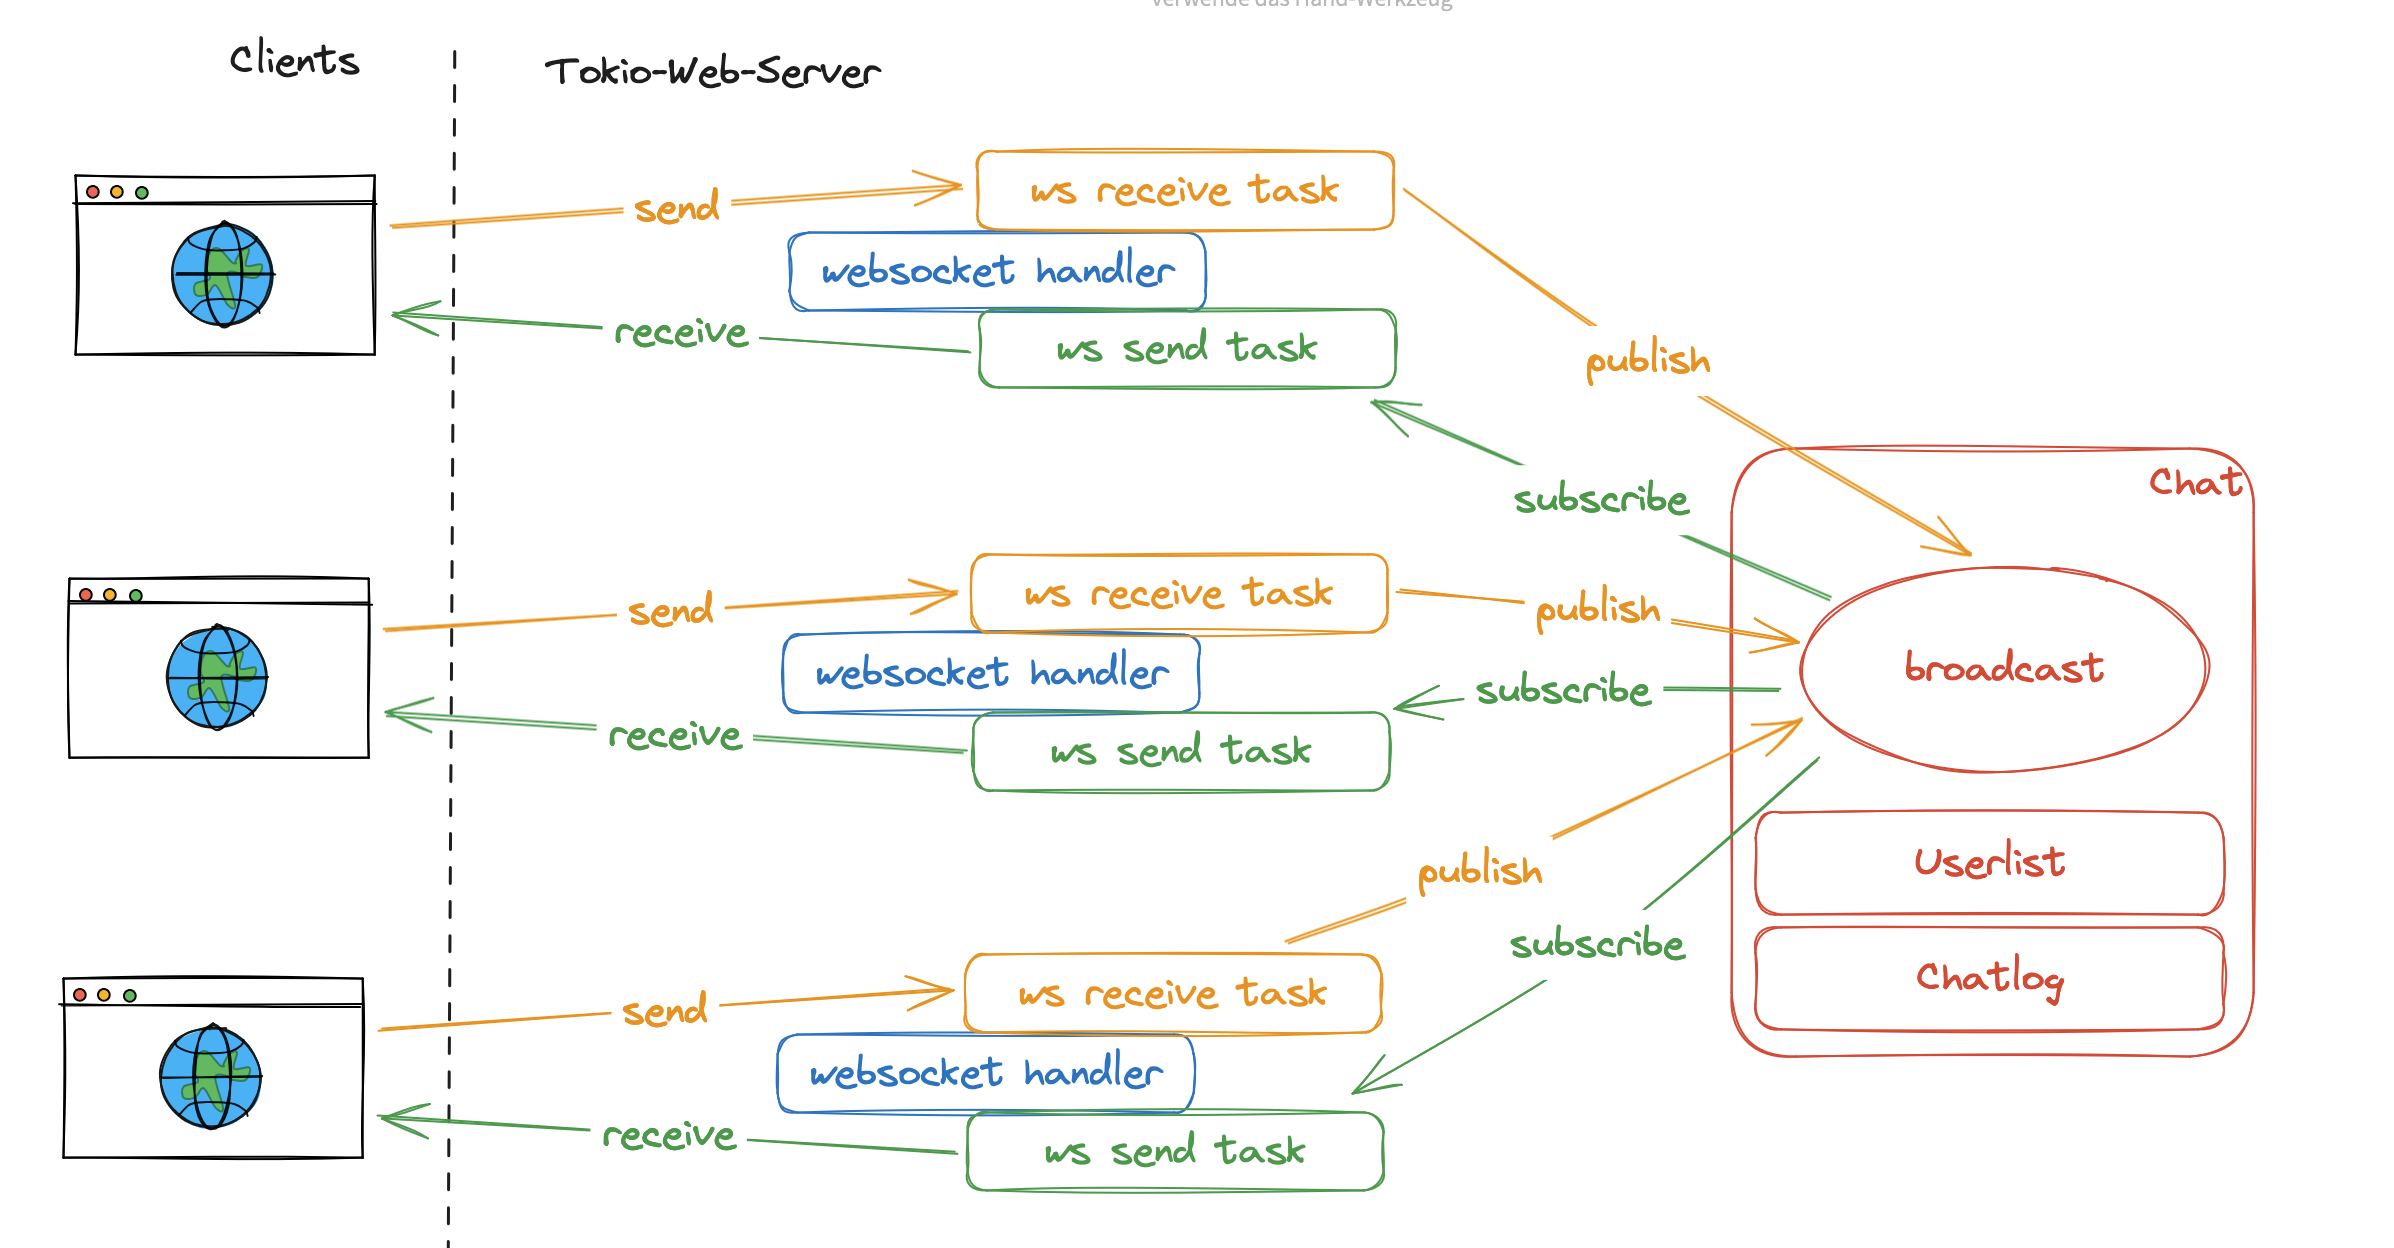
Moreover, implementing a chat feature allows us to demonstrate an important aspect of asynchronous programming: the ability to continue processing chat messages even when the runtime temporarily blocks and then resumes. This showcases the robustness and efficiency of the asynchronous model in handling concurrent operations, which is particularly valuable in real-time communication scenarios like chat applications.</p><h2 id="implementation">Implementation<a class="heading-anchor" href="#implementation" aria-hidden="true">#</a></h2><p>The implementation of the chat functionality in this demo is intentionally kept very simplistic. This approach allows us to focus on the core concepts and functionality without getting bogged down in complex details.
To achieve this, the implementation leverages htmx for dynamic HTML updates, WebSockets for real-time bidirectional communication between browser and webserver, and broadcast channels for efficiently distributing messages to multiple connected clients. This combination of technologies enables a responsive and interactive chat experience while demonstrating the power and simplicity of using the tokio runtime for asynchronous operations in Rust.</p><h3 id="disclaimer">Disclaimer<a class="heading-anchor" href="#disclaimer" aria-hidden="true">#</a></h3><p>The article assumes that readers know a little bit about Rust and HTML and do have a general idea of the concepts of<a href="https://tokio.rs" target="_blank" rel="noopener">asynchronous Rust programming</a>
,<a href="https://htmx.org" target="_blank" rel="noopener">HTMX</a>
and<a href="https://de.wikipedia.org/wiki/WebSocket" target="_blank" rel="noopener">WebSockets</a>
. If you&rsquo;re unfamiliar with these concepts, please click the links to learn more.</p><h3 id="chatmessage">ChatMessage<a class="heading-anchor" href="#chatmessage" aria-hidden="true">#</a></h3><p>The ChatMessage struct represents a single ChatMessage and is very simple.</p><div class="highlight"><pre tabindex="0" class="chroma"><code class="language-rust" data-lang="rust"><span class="line"><span class="cl"><span class="k">struct</span><span class="nc">ChatMessage</span><span class="w"/><span class="p">{</span><span class="w"/></span></span><span class="line"><span class="cl"><span class="w"/><span class="n">timestamp</span>:<span class="nc">NaiveDateTime</span><span class="p">,</span><span class="w"/></span></span><span class="line"><span class="cl"><span class="w"/><span class="n">username</span>:<span class="nb">String</span><span class="p">,</span><span class="w"/></span></span><span class="line"><span class="cl"><span class="w"/><span class="n">message</span>:<span class="nb">String</span><span class="p">,</span><span class="w"/></span></span><span class="line"><span class="cl"><span class="p">}</span><span class="w"/></span></span></code></pre></div><p>It has a simple timestamp, a username and a message. It implements two functions:</p><div class="highlight"><pre tabindex="0" class="chroma"><code class="language-rust" data-lang="rust"><span class="line"><span class="cl"><span class="k">impl</span><span class="w"/><span class="n">ChatMessage</span><span class="w"/><span class="p">{</span><span class="w"/></span></span><span class="line"><span class="cl"><span class="w"/><span class="sd">/// Used to generate message representations in the actual program log</span></span></span><span class="line"><span class="cl"><span class="w"/><span class="k">fn</span><span class="nf">log</span><span class="p">(</span><span class="o">&amp;</span><span class="bp">self</span><span class="p">)</span><span class="w"/>-&gt;<span class="nb">String</span><span class="p">{</span><span class="w"/></span></span><span class="line"><span class="cl"><span class="w"/><span class="sd">/// ...</span></span></span><span class="line"><span class="cl"><span class="w"/><span class="p">}</span><span class="w"/></span></span><span class="line"><span class="cl"><span class="w"/><span class="sd">/// On the WebSocket, we reply with HTML to be used with the HTMX Rust extension</span></span></span><span class="line"><span class="cl"><span class="w"/><span class="k">fn</span><span class="nf">websocket_reply</span><span class="p">(</span><span class="o">&amp;</span><span class="bp">self</span><span class="p">)</span><span class="w"/>-&gt;<span class="nb">String</span><span class="p">{</span><span class="w"/></span></span><span class="line"><span class="cl"><span class="w"/><span class="sd">/// ...</span></span></span><span class="line"><span class="cl"><span class="w"/><span class="p">}</span><span class="w"/></span></span><span class="line"><span class="cl"><span class="p">}</span><span class="w"/></span></span></code></pre></div><h3 id="chat">Chat<a class="heading-anchor" href="#chat" aria-hidden="true">#</a></h3><p>To send a chatmessage between multiple clients, we use another struct called<code>Chat</code>. Different chats can be instanciated in one binary, but practically this is used as a singleton. If you would extend the tool later to support multiple Chat channels, you would likely rename<code>Chat</code> to<code>Channel</code>.</p><div class="highlight"><pre tabindex="0" class="chroma"><code class="language-rust" data-lang="rust"><span class="line"><span class="cl"><span class="k">pub</span><span class="w"/><span class="k">struct</span><span class="nc">Chat</span><span class="w"/><span class="p">{</span><span class="w"/></span></span><span class="line"><span class="cl"><span class="w"/><span class="c1">// The actual broadcast channel</span></span></span><span class="line"><span class="cl"><span class="w"/><span class="n">tx</span>:<span class="nc">tokio</span>::<span class="n">sync</span>::<span class="n">broadcast</span>::<span class="n">Sender</span><span class="o">&lt;</span><span class="n">ChatMessage</span><span class="o">&gt;</span><span class="p">,</span><span class="w"/></span></span><span class="line"><span class="cl"><span class="w"/><span class="c1">// A set of unique users which are connected,</span></span></span><span class="line"><span class="cl"><span class="w"/><span class="c1">// so two clients cannot claim the same name</span></span></span><span class="line"><span class="cl"><span class="w"/><span class="n">users</span>:<span class="nc">RwLock</span><span class="o">&lt;</span><span class="n">HashSet</span><span class="o">&lt;</span><span class="nb">String</span><span class="o">&gt;&gt;</span><span class="p">,</span><span class="w"/></span></span><span class="line"><span class="cl"><span class="w"/><span class="c1">// A Fist-In-First-Out log of ChatMessages,</span></span></span><span class="line"><span class="cl"><span class="w"/><span class="c1">// to also display for new connected users</span></span></span><span class="line"><span class="cl"><span class="w"/><span class="n">log</span>:<span class="nc">RwLock</span><span class="o">&lt;</span><span class="n">VecDeque</span><span class="o">&lt;</span><span class="n">ChatMessage</span><span class="o">&gt;&gt;</span><span class="p">,</span><span class="w"/></span></span><span class="line"><span class="cl"><span class="p">}</span><span class="w"/></span></span></code></pre></div><p>For a tokio broadcast channel, it is sufficient to just store the &ldquo;Sender&rdquo; structure on creation, since new &ldquo;Receivers&rdquo; can be derived from the Sender calling<code>let recv = chat.tx.subscribe();</code>. The users and log are stored in a<code>RwLock</code> structure, since multiple threads might be using the inner collections and<code>read()</code> and<code>write()</code> access need to be properly synchronized here. Also, it is important to use<code>tokio::sync::RwLock</code> instead of<code>std::sync::RwLock</code>, since the first one is a non-blocking and async implentation. Finally, I decided to use a<code>VecDeque</code> instead of<code>Vec</code>, so I can add messages with<code>push_back()</code> and remove them on the other hand with<code>pop_front()</code> if the structure exceeds it&rsquo;s limits.</p><h3 id="creating-the-websocket-using-htmx">Creating the WebSocket using HTMX<a class="heading-anchor" href="#creating-the-websocket-using-htmx" aria-hidden="true">#</a></h3><p>The webserver is implemented using the library<code>axum</code>. The design of the chat interaction between client and server is the following:</p><p><figure><img src="/async_demo_chat/client_server.png" width="1760" height="1040" srcset="/async_demo_chat/client_server_hu_24702ae4e9ef2951.png 480w, /async_demo_chat/client_server_hu_b88623457d68cb9e.png 1024w" loading="lazy" alt="Client Server Communication"/></figure></p><h4 id="logging-into-the-chatroom">Logging into the Chatroom<a class="heading-anchor" href="#logging-into-the-chatroom" aria-hidden="true">#</a></h4><p>When a user submits the login form, it invokes the<code>chat::chat()</code> function.</p><div class="highlight"><pre tabindex="0" class="chroma"><code class="language-rust" data-lang="rust"><span class="line"><span class="cl"><span class="k">pub</span><span class="w"/><span class="k">async</span><span class="w"/><span class="k">fn</span><span class="nf">chat</span><span class="p">(</span><span class="n">State</span><span class="p">(</span><span class="n">chat</span><span class="p">)</span>:<span class="nc">State</span><span class="o">&lt;</span><span class="n">Arc</span><span class="o">&lt;</span><span class="n">Chat</span><span class="o">&gt;&gt;</span><span class="p">,</span><span class="w"/><span class="n">Form</span><span class="p">(</span><span class="n">f</span><span class="p">)</span>:<span class="nc">Form</span><span class="o">&lt;</span><span class="n">Chatform</span><span class="o">&gt;</span><span class="p">)</span><span class="w"/>-&gt;<span class="nc">impl</span><span class="w"/><span class="n">IntoResponse</span><span class="w"/><span class="p">{</span><span class="w"/></span></span><span class="line"><span class="cl"><span class="w"/><span class="c1">// join chat</span></span></span><span class="line"><span class="cl"><span class="w"/><span class="k">if</span><span class="w"/><span class="n">f</span><span class="p">.</span><span class="n">name</span><span class="p">.</span><span class="n">to_lowercase</span><span class="p">()</span><span class="w"/><span class="o">==</span><span class="w"/><span class="s">"system"</span><span class="w"/><span class="p">{</span><span class="w"/></span></span><span class="line"><span class="cl"><span class="w"/><span class="k">return</span><span class="w"/><span class="s">"Username 'system' is not allowed"</span><span class="p">.</span><span class="n">into</span><span class="p">();</span><span class="w"/></span></span><span class="line"><span class="cl"><span class="w"/><span class="p">}</span><span class="w"/></span></span><span class="line"><span class="cl"><span class="w"/><span class="k">if</span><span class="w"/><span class="kd">let</span><span class="w"/><span class="nb">Err</span><span class="p">(</span><span class="n">e</span><span class="p">)</span><span class="w"/><span class="o">=</span><span class="w"/><span class="n">chat</span><span class="p">.</span><span class="n">join</span><span class="p">(</span><span class="n">f</span><span class="p">.</span><span class="n">name</span><span class="p">.</span><span class="n">clone</span><span class="p">()).</span><span class="k">await</span><span class="w"/><span class="p">{</span><span class="w"/></span></span><span class="line"><span class="cl"><span class="w"/><span class="k">return</span><span class="w"/><span class="n">e</span><span class="p">.</span><span class="n">into</span><span class="p">();</span><span class="w"/></span></span><span class="line"><span class="cl"><span class="w"/><span class="p">};</span><span class="w"/></span></span><span class="line"><span class="cl"><span class="w"/><span class="fm">format!</span><span class="p">(</span><span class="w"/></span></span><span class="line"><span class="cl"><span class="w"/><span class="c1">// magix HTMX response</span></span></span><span class="line"><span class="cl"><span class="w"/><span class="p">)</span><span class="w"/></span></span><span class="line"><span class="cl"><span class="p">}</span><span class="w"/></span></span></code></pre></div><p>The chat function first checks if the provided username is a case insensitive version of &ldquo;system&rdquo;, which is a reserved username. If this is the case, it will respond with an error. If the username is okay, the the user &ldquo;joins&rdquo; the chat room and therefore blocks any other clients joining with the same username.</p><p>Finally, the server will respond with HTML that is automatically injected into the browsers DOM by HTMX. Look at the HTML before the user clicks on &ldquo;Join Chat&rdquo;:</p><div class="highlight"><pre tabindex="0" class="chroma"><code class="language-html" data-lang="html"><span class="line"><span class="cl"><span class="p">&lt;</span><span class="nt">div</span><span class="na">class</span><span class="o">=</span><span class="s">"card"</span><span class="p">&gt;</span></span></span><span class="line"><span class="cl"><span class="p">&lt;</span><span class="nt">div</span><span class="na">class</span><span class="o">=</span><span class="s">"card-header"</span><span class="p">&gt;</span></span></span><span class="line"><span class="cl"> Chat</span></span><span class="line"><span class="cl"><span class="p">&lt;/</span><span class="nt">div</span><span class="p">&gt;</span></span></span><span class="line"><span class="cl"><span class="p">&lt;</span><span class="nt">div</span><span class="na">class</span><span class="o">=</span><span class="s">"card-body"</span><span class="na">id</span><span class="o">=</span><span class="s">"chat"</span><span class="p">&gt;</span></span></span><span class="line"><span class="cl"><span class="p">&lt;</span><span class="nt">form</span><span class="na">hx-post</span><span class="o">=</span><span class="s">"/chat"</span><span class="na">hx-target</span><span class="o">=</span><span class="s">"#chat"</span><span class="p">&gt;</span></span></span><span class="line"><span class="cl"><span class="p">&lt;</span><span class="nt">input</span><span class="na">id</span><span class="o">=</span><span class="s">"name"</span><span class="na">name</span><span class="o">=</span><span class="s">"name"</span><span class="na">type</span><span class="o">=</span><span class="s">"text"</span><span class="na">class</span><span class="o">=</span><span class="s">"form-control"</span><span class="p">/&gt;</span></span></span><span class="line"><span class="cl"><span class="p">&lt;</span><span class="nt">label</span><span class="na">for</span><span class="o">=</span><span class="s">"#tasks"</span><span class="na">class</span><span class="o">=</span><span class="s">"form-label"</span><span class="p">&gt;</span>Username<span class="p">&lt;/</span><span class="nt">label</span><span class="p">&gt;</span></span></span><span class="line"><span class="cl"><span class="p">&lt;</span><span class="nt">br</span><span class="p">/&gt;</span></span></span><span class="line"><span class="cl"><span class="p">&lt;</span><span class="nt">button</span><span class="na">class</span><span class="o">=</span><span class="s">"btn btn-primary"</span><span class="na">type</span><span class="o">=</span><span class="s">"submit"</span><span class="p">&gt;</span>Join Chat<span class="p">&lt;/</span><span class="nt">button</span><span class="p">&gt;</span></span></span><span class="line"><span class="cl"><span class="p">&lt;/</span><span class="nt">form</span><span class="p">&gt;</span></span></span><span class="line"><span class="cl"><span class="p">&lt;/</span><span class="nt">div</span><span class="p">&gt;</span></span></span><span class="line"><span class="cl"><span class="p">&lt;/</span><span class="nt">div</span><span class="p">&gt;</span></span></span></code></pre></div><p>The chat window is a typical bootstrap Card element, with &ldquo;Chat&rdquo; as a header and a body containing a form with a input field for a username and a &ldquo;Join Chat&rdquo; button. If you click that button, HTMX will intercept the browser event, and instead of sending a POST request and reloading the page, it will do an asynchronous<code>POST</code> request to the webservers URL<code>&lt;server&gt;/chat</code> (see attribute<code>hx-post</code>). HTMX will expect an HTML based response, and inject replace the content of the HTML element defined with<code>hx-target</code>. The servers response looks like this:</p><div class="highlight"><pre tabindex="0" class="chroma"><code class="language-html" data-lang="html"><span class="line"><span class="cl"><span class="p">&lt;</span><span class="nt">div</span><span class="na">id</span><span class="o">=</span><span class="s">"openChat"</span><span class="na">hx-ext</span><span class="o">=</span><span class="s">"ws"</span><span class="na">ws-connect</span><span class="o">=</span><span class="s">"/ws/chat/{user_hash}"</span><span class="p">&gt;</span></span></span><span class="line"><span class="cl"><span class="c">&lt;!-- ... Chat ... --&gt;</span></span></span><span class="line"><span class="cl"><span class="p">&lt;/</span><span class="nt">div</span><span class="p">&gt;</span></span></span></code></pre></div><p>Which results in the general content:</p><div class="highlight"><pre tabindex="0" class="chroma"><code class="language-html" data-lang="html"><span class="line"><span class="cl"><span class="p">&lt;</span><span class="nt">div</span><span class="na">class</span><span class="o">=</span><span class="s">"card"</span><span class="p">&gt;</span></span></span><span class="line"><span class="cl"><span class="p">&lt;</span><span class="nt">div</span><span class="na">class</span><span class="o">=</span><span class="s">"card-header"</span><span class="p">&gt;</span></span></span><span class="line"><span class="cl"> Chat</span></span><span class="line"><span class="cl"><span class="p">&lt;/</span><span class="nt">div</span><span class="p">&gt;</span></span></span><span class="line"><span class="cl"><span class="p">&lt;</span><span class="nt">div</span><span class="na">class</span><span class="o">=</span><span class="s">"card-body"</span><span class="na">id</span><span class="o">=</span><span class="s">"chat"</span><span class="p">&gt;</span></span></span><span class="line"><span class="cl"><span class="c">&lt;!-- HTMX response --&gt;</span></span></span><span class="line"><span class="cl"><span class="p">&lt;</span><span class="nt">div</span><span class="na">id</span><span class="o">=</span><span class="s">"openChat"</span><span class="na">hx-ext</span><span class="o">=</span><span class="s">"ws"</span><span class="na">ws-connect</span><span class="o">=</span><span class="s">"/ws/chat/{user_hash}"</span><span class="p">&gt;</span></span></span><span class="line"><span class="cl"><span class="p">&lt;</span><span class="nt">div</span><span class="na">class</span><span class="o">=</span><span class="s">"mb-3"</span><span class="p">&gt;</span></span></span><span class="line"><span class="cl"><span class="p">&lt;</span><span class="nt">form</span><span class="na">ws-send</span><span class="p">&gt;</span></span></span><span class="line"><span class="cl"><span class="p">&lt;</span><span class="nt">div</span><span class="na">class</span><span class="o">=</span><span class="s">"input-group"</span><span class="p">&gt;</span></span></span><span class="line"><span class="cl"><span class="p">&lt;</span><span class="nt">input</span><span class="na">name</span><span class="o">=</span><span class="s">"chat_message"</span><span class="na">type</span><span class="o">=</span><span class="s">"text"</span><span class="na">class</span><span class="o">=</span><span class="s">"form-control"</span><span class="na">placeholder</span><span class="o">=</span><span class="s">"Type your message..."</span><span class="p">&gt;</span></span></span><span class="line"><span class="cl"><span class="p">&lt;</span><span class="nt">button</span><span class="na">class</span><span class="o">=</span><span class="s">"btn btn-primary"</span><span class="na">type</span><span class="o">=</span><span class="s">"button"</span><span class="p">&gt;</span>Send<span class="p">&lt;/</span><span class="nt">button</span><span class="p">&gt;</span></span></span><span class="line"><span class="cl"><span class="p">&lt;/</span><span class="nt">div</span><span class="p">&gt;</span></span></span><span class="line"><span class="cl"><span class="p">&lt;/</span><span class="nt">form</span><span class="p">&gt;</span></span></span><span class="line"><span class="cl"><span class="p">&lt;/</span><span class="nt">div</span><span class="p">&gt;</span></span></span><span class="line"><span class="cl"><span class="p">&lt;</span><span class="nt">div</span><span class="na">id</span><span class="o">=</span><span class="s">"chatBox"</span><span class="na">class</span><span class="o">=</span><span class="s">"chat-container"</span><span class="p">&gt;</span></span></span><span class="line"><span class="cl"><span class="p">&lt;/</span><span class="nt">div</span><span class="p">&gt;</span></span></span><span class="line"><span class="cl"><span class="p">&lt;/</span><span class="nt">div</span><span class="p">&gt;</span></span></span><span class="line"><span class="cl"><span class="c">&lt;!-- /HTMX response --&gt;</span></span></span><span class="line"><span class="cl"><span class="p">&lt;/</span><span class="nt">div</span><span class="p">&gt;</span></span></span><span class="line"><span class="cl"><span class="p">&lt;/</span><span class="nt">div</span><span class="p">&gt;</span></span></span></code></pre></div><p>You can see, that after a chat join, the browser content has been exchanged with additional HTMX elements. The attribute<code>hx-ext</code> tells the browser to toggle the WebSocket extension<code>ws</code> for this element and all child elements, which enables the call of<code>ws-connect</code>. This call establishes a connection to a WebSocket at the URL<code>&lt;server&gt;/ws/chat/{user_hash}</code> (blue part in the diagram above). We use a user_hash instead of the real username to make it more difficult to fake it. Hence you would have to provide a hash that&rsquo;s already in the List of users to connect to the socket in the name of another user. Since the whole project is for demonstrational purpose and does not have a real user system in scope, this seems to be secure enough.</p><h3 id="exchange-of-chat-messages-frontend-side">Exchange of chat messages (Frontend Side)<a class="heading-anchor" href="#exchange-of-chat-messages-frontend-side" aria-hidden="true">#</a></h3><p>Chat messages are exchanged via the WebSocket extension of HTMX. This extension has a very interesting internal decision. While in general HTMX encourages to use Query Parameters and WebForms over JSON, and expects HTML as responses, WebSockets do actually send data in JSON format, but do expect a HTML response. If a user types the chat message &ldquo;Hello World&rdquo;, the server receives a JSON chat message, and broadcasts it to all connected clients (including the sending client).</p><div class="highlight"><pre tabindex="0" class="chroma"><code class="language-json" data-lang="json"><span class="line"><span class="cl"><span class="p">{</span></span></span><span class="line"><span class="cl"><span class="nt">"chat_message"</span><span class="p">:</span><span class="s2">"Hello World"</span><span class="p">,</span></span></span><span class="line"><span class="cl"><span class="nt">"HEADERS"</span><span class="p">:</span><span class="p">{</span></span></span><span class="line"><span class="cl"><span class="nt">"HX-Request"</span><span class="p">:</span><span class="s2">"true"</span><span class="p">,</span></span></span><span class="line"><span class="cl"><span class="nt">"HX-Trigger"</span><span class="p">:</span><span class="kc">null</span><span class="p">,</span></span></span><span class="line"><span class="cl"><span class="nt">"HX-Trigger-Name"</span><span class="p">:</span><span class="kc">null</span><span class="p">,</span></span></span><span class="line"><span class="cl"><span class="nt">"HX-Target"</span><span class="p">:</span><span class="kc">null</span><span class="p">,</span></span></span><span class="line"><span class="cl"><span class="nt">"HX-Current-URL"</span><span class="p">:</span><span class="s2">"http://localhost:8123/"</span></span></span><span class="line"><span class="cl"><span class="p">}</span></span></span><span class="line"><span class="cl"><span class="p">}</span></span></span></code></pre></div><p>If the server is sending a response to the client, it is received as HTML with HTMX attributes to give the library the opportunity to insert the message at the correct location:</p><div class="highlight"><pre tabindex="0" class="chroma"><code class="language-html" data-lang="html"><span class="line"><span class="cl"><span class="p">&lt;</span><span class="nt">div</span><span class="na">id</span><span class="o">=</span><span class="s">"chatBox"</span><span class="na">hx-swap-oob</span><span class="o">=</span><span class="s">"afterbegin"</span><span class="p">&gt;</span></span></span><span class="line"><span class="cl"><span class="p">&lt;</span><span class="nt">div</span><span class="na">class</span><span class="o">=</span><span class="s">"chat-message"</span><span class="p">&gt;</span></span></span><span class="line"><span class="cl"><span class="p">&lt;</span><span class="nt">strong</span><span class="p">&gt;</span>{username}:<span class="p">&lt;/</span><span class="nt">strong</span><span class="p">&gt;</span></span></span><span class="line"><span class="cl"><span class="p">&lt;</span><span class="nt">span</span><span class="na">class</span><span class="o">=</span><span class="s">"timestamp"</span><span class="p">&gt;</span>{timestamp}<span class="p">&lt;/</span><span class="nt">span</span><span class="p">&gt;</span></span></span><span class="line"><span class="cl"><span class="p">&lt;</span><span class="nt">p</span><span class="p">&gt;</span>{message}<span class="p">&lt;/</span><span class="nt">p</span><span class="p">&gt;</span></span></span><span class="line"><span class="cl"><span class="p">&lt;</span><span class="nt">div</span><span class="p">&gt;</span></span></span><span class="line"><span class="cl"><span class="p">&lt;/</span><span class="nt">div</span><span class="p">&gt;</span></span></span></code></pre></div><p>The outer div instructs HTMX to add the element at the<strong>top</strong> (afterbegin) of the element with the id<code>chatBox</code>. Which would after correct insertion look like this in the opened chat:</p><div class="highlight"><pre tabindex="0" class="chroma"><code class="language-html" data-lang="html"><span class="line"><span class="cl"><span class="p">&lt;</span><span class="nt">div</span><span class="na">id</span><span class="o">=</span><span class="s">"openChat"</span><span class="na">hx-ext</span><span class="o">=</span><span class="s">"ws"</span><span class="na">ws-connect</span><span class="o">=</span><span class="s">"/ws/chat/{user_hash}"</span><span class="p">&gt;</span></span></span><span class="line"><span class="cl"><span class="p">&lt;</span><span class="nt">div</span><span class="na">class</span><span class="o">=</span><span class="s">"mb-3"</span><span class="p">&gt;</span></span></span><span class="line"><span class="cl"><span class="c">&lt;!-- Send form --&gt;</span></span></span><span class="line"><span class="cl"><span class="p">&lt;/</span><span class="nt">div</span><span class="p">&gt;</span></span></span><span class="line"><span class="cl"><span class="p">&lt;</span><span class="nt">div</span><span class="na">id</span><span class="o">=</span><span class="s">"chatBox"</span><span class="na">class</span><span class="o">=</span><span class="s">"chat-container"</span><span class="p">&gt;</span></span></span><span class="line"><span class="cl"><span class="p">&lt;</span><span class="nt">div</span><span class="na">class</span><span class="o">=</span><span class="s">"chat-message"</span><span class="p">&gt;</span></span></span><span class="line"><span class="cl"><span class="p">&lt;</span><span class="nt">strong</span><span class="p">&gt;</span>{username}:<span class="p">&lt;/</span><span class="nt">strong</span><span class="p">&gt;</span></span></span><span class="line"><span class="cl"><span class="p">&lt;</span><span class="nt">span</span><span class="na">class</span><span class="o">=</span><span class="s">"timestamp"</span><span class="p">&gt;</span>{timestamp}<span class="p">&lt;/</span><span class="nt">span</span><span class="p">&gt;</span></span></span><span class="line"><span class="cl"><span class="p">&lt;</span><span class="nt">p</span><span class="p">&gt;</span>{message}<span class="p">&lt;/</span><span class="nt">p</span><span class="p">&gt;</span></span></span><span class="line"><span class="cl"><span class="p">&lt;</span><span class="nt">div</span><span class="p">&gt;</span></span></span><span class="line"><span class="cl"><span class="c">&lt;!-- older chat messages... --&gt;</span></span></span><span class="line"><span class="cl"><span class="p">&lt;/</span><span class="nt">div</span><span class="p">&gt;</span></span></span><span class="line"><span class="cl"><span class="p">&lt;/</span><span class="nt">div</span><span class="p">&gt;</span></span></span></code></pre></div><h3 id="exchange-of-chat-messages-backend-side">Exchange of chat messages (backend side)<a class="heading-anchor" href="#exchange-of-chat-messages-backend-side" aria-hidden="true">#</a></h3><p><figure><img src="/async_demo_chat/clients_channel.png" width="2394" height="1248" srcset="/async_demo_chat/clients_channel_hu_8ab999fb8e97a19c.png 480w, /async_demo_chat/clients_channel_hu_a4664541862452ca.png 1024w" loading="lazy" alt="Client Server Communication"/></figure></p><p>On the backend, the WebSocket connection is upgraded into a handler function with the name<code>chat::websocket_handler()</code>. This function is doing a few straight forward, but interesting things:</p><div class="highlight"><pre tabindex="0" class="chroma"><code class="language-rust" data-lang="rust"><span class="line"><span class="cl"><span class="kd">let</span><span class="w"/><span class="nb">Some</span><span class="p">(</span><span class="n">user</span><span class="p">)</span><span class="w"/><span class="o">=</span><span class="w"/><span class="n">chat</span><span class="p">.</span><span class="n">find</span><span class="p">(</span><span class="n">id</span><span class="p">).</span><span class="k">await</span><span class="w"/><span class="k">else</span><span class="w"/><span class="p">{</span><span class="w"/></span></span><span class="line"><span class="cl"><span class="w"/><span class="n">log</span>::<span class="fm">warn!</span><span class="p">(</span><span class="s">"user with id '{id}' cannot be found"</span><span class="p">);</span><span class="w"/></span></span><span class="line"><span class="cl"><span class="w"/><span class="kd">let</span><span class="w"/><span class="n">_</span><span class="w"/><span class="o">=</span><span class="w"/><span class="n">ws</span><span class="p">.</span><span class="n">close</span><span class="p">().</span><span class="k">await</span><span class="p">;</span><span class="w"/></span></span><span class="line"><span class="cl"><span class="w"/><span class="k">return</span><span class="p">;</span><span class="w"/></span></span><span class="line"><span class="cl"><span class="p">}</span><span class="w"/></span></span></code></pre></div><p>First of all, remember how the WebSocket connects with an<code>id</code> instead of a username for security. This function tries to find a fitting registered username for the id. If not found, it will respond with a &ldquo;user cannot be found&rdquo; message and close the socket. If a user was found, the variable<code>user</code> is available in the following code.</p><p>After that, the WebSocket is split into two different elements, a<code>send()</code> and a<code>recv()</code> part. Both are to be used in two different asynchronous running tasks. Since we cannot clone the WebSocket, it&rsquo;s important to split it to be able to send and receive from different tasks.</p><div class="highlight"><pre tabindex="0" class="chroma"><code class="language-rust" data-lang="rust"><span class="line"><span class="cl"><span class="kd">let</span><span class="w"/><span class="p">(</span><span class="k">mut</span><span class="w"/><span class="n">ws_send</span><span class="p">,</span><span class="w"/><span class="k">mut</span><span class="w"/><span class="n">ws_recv</span><span class="p">)</span><span class="w"/><span class="o">=</span><span class="w"/><span class="n">ws</span><span class="p">.</span><span class="n">split</span><span class="p">();</span><span class="w"/></span></span></code></pre></div><p>The same needs to be done for the publish and subscribe, or send and receive parts to the Chat backend. In the implementation of the<code>broadcast</code> channel of rust, you can get a handle to the receiving part<code>rx</code> part by calling the<code>subscribe()</code> function on the sending part<code>tx</code>.</p><div class="highlight"><pre tabindex="0" class="chroma"><code class="language-rust" data-lang="rust"><span class="line"><span class="cl"><span class="kd">let</span><span class="w"/><span class="p">(</span><span class="n">chat_tx</span><span class="p">,</span><span class="w"/><span class="k">mut</span><span class="w"/><span class="n">chat_rx</span><span class="p">)</span><span class="w"/><span class="o">=</span><span class="w"/><span class="p">(</span><span class="n">chat</span><span class="p">.</span><span class="n">tx</span><span class="p">.</span><span class="n">clone</span><span class="p">(),</span><span class="w"/><span class="n">chat</span><span class="p">.</span><span class="n">tx</span><span class="p">.</span><span class="n">subscribe</span><span class="p">());</span><span class="w"/></span></span></code></pre></div><p>Then, two tasks are spawned:</p><div class="highlight"><pre tabindex="0" class="chroma"><code class="language-rust" data-lang="rust"><span class="line"><span class="cl"><span class="kd">let</span><span class="w"/><span class="k">mut</span><span class="w"/><span class="n">ws_to_chat_task</span><span class="w"/><span class="o">=</span><span class="w"/><span class="n">tokio</span>::<span class="n">spawn</span><span class="p">(</span><span class="k">async</span><span class="w"/><span class="k">move</span><span class="w"/><span class="p">{</span><span class="w"/></span></span><span class="line"><span class="cl"><span class="w"/><span class="sd">/// From WebSocket to Chat</span></span></span><span class="line"><span class="cl"><span class="p">});</span><span class="w"/></span></span><span class="line"><span class="cl"><span class="kd">let</span><span class="w"/><span class="k">mut</span><span class="w"/><span class="n">ws_to_chat_task</span><span class="w"/><span class="o">=</span><span class="w"/><span class="n">tokio</span>::<span class="n">spawn</span><span class="p">(</span><span class="k">async</span><span class="w"/><span class="k">move</span><span class="w"/><span class="p">{</span><span class="w"/></span></span><span class="line"><span class="cl"><span class="w"/><span class="sd">/// From Chat to WebSocket</span></span></span><span class="line"><span class="cl"><span class="p">});</span><span class="w"/></span></span></code></pre></div><p>The following part receives messages from the WebSocket, and sends it to the Chat Backend:</p><div class="highlight"><pre tabindex="0" class="chroma"><code class="language-rust" data-lang="rust"><span class="line"><span class="cl"><span class="kd">let</span><span class="w"/><span class="k">mut</span><span class="w"/><span class="n">ws_to_chat_task</span><span class="w"/><span class="o">=</span><span class="w"/><span class="n">tokio</span>::<span class="n">spawn</span><span class="p">(</span><span class="k">async</span><span class="w"/><span class="k">move</span><span class="w"/><span class="p">{</span><span class="w"/></span></span><span class="line"><span class="cl"><span class="w"/><span class="k">while</span><span class="w"/><span class="kd">let</span><span class="w"/><span class="nb">Some</span><span class="p">(</span><span class="nb">Ok</span><span class="p">(</span><span class="n">message</span><span class="p">))</span><span class="w"/><span class="o">=</span><span class="w"/><span class="n">ws_recv</span><span class="p">.</span><span class="n">next</span><span class="p">().</span><span class="k">await</span><span class="w"/><span class="p">{</span><span class="w"/></span></span><span class="line"><span class="cl"><span class="w"/><span class="k">match</span><span class="w"/><span class="n">message</span><span class="w"/><span class="p">{</span><span class="w"/></span></span><span class="line"><span class="cl"><span class="w"/><span class="n">Message</span>::<span class="n">Text</span><span class="p">(</span><span class="n">msg</span><span class="p">)</span><span class="w"/><span class="o">=&gt;</span><span class="w"/><span class="p">{</span><span class="w"/></span></span><span class="line"><span class="cl"><span class="w"/><span class="n">chat</span><span class="p">.</span><span class="n">log</span><span class="p">(</span><span class="o">&amp;</span><span class="n">msg</span><span class="p">).</span><span class="k">await</span><span class="p">;</span><span class="w"/></span></span><span class="line"><span class="cl"><span class="w"/><span class="k">if</span><span class="w"/><span class="kd">let</span><span class="w"/><span class="nb">Err</span><span class="p">(</span><span class="n">e</span><span class="p">)</span><span class="w"/><span class="o">=</span><span class="w"/><span class="n">chat_tx</span><span class="p">.</span><span class="n">send</span><span class="p">(</span><span class="n">msg</span><span class="p">)</span><span class="w"/><span class="p">{</span><span class="w"/></span></span><span class="line"><span class="cl"><span class="w"/><span class="n">log</span>::<span class="fm">error!</span><span class="p">(</span><span class="s">"Cannot send chat message: {e}"</span><span class="p">);</span><span class="w"/></span></span><span class="line"><span class="cl"><span class="w"/><span class="p">};</span><span class="w"/></span></span><span class="line"><span class="cl"><span class="w"/><span class="p">}</span><span class="w"/></span></span><span class="line"><span class="cl"><span class="w"/><span class="n">Message</span>::<span class="n">Close</span><span class="p">(</span><span class="n">_</span><span class="p">)</span><span class="w"/><span class="o">=&gt;</span><span class="w"/><span class="p">{</span><span class="w"/></span></span><span class="line"><span class="cl"><span class="w"/><span class="n">log</span>::<span class="fm">warn!</span><span class="p">(</span><span class="s">"Socket for user '{}' closed by client"</span><span class="p">,</span><span class="w"/><span class="n">ws_recv_user</span><span class="p">);</span><span class="w"/></span></span><span class="line"><span class="cl"><span class="w"/><span class="k">return</span><span class="p">;</span><span class="w"/></span></span><span class="line"><span class="cl"><span class="w"/><span class="p">}</span><span class="w"/></span></span><span class="line"><span class="cl"><span class="w"/><span class="p">}</span><span class="w"/></span></span><span class="line"><span class="cl"><span class="w"/><span class="p">}</span><span class="w"/></span></span><span class="line"><span class="cl"><span class="p">});</span><span class="w"/></span></span></code></pre></div><p>The first line if the spawned function is the most important one. It utilizes the<code>ws_recv</code> receiving end of the WebSocket, and asynchronously waits for a message. If something different than a valid message is received, the<code>while</code> loop would terminate and therefore the whole task. If valid messages are coming in, the messages is matched on it&rsquo;s type. If the received message is a<code>Close</code> request, the code writes a log message and closes the task. If a valid<code>Text</code> type is received, the message is being added to the chat log and after that sent to the Chat backend using the sending side<code>chat_tx</code>. This means, that this side does<code>websocket receive -&gt; send chat</code>.</p><p>The other direction is even simpler:</p><div class="highlight"><pre tabindex="0" class="chroma"><code class="language-rust" data-lang="rust"><span class="line"><span class="cl"><span class="kd">let</span><span class="w"/><span class="k">mut</span><span class="w"/><span class="n">chat_to_ws_task</span><span class="w"/><span class="o">=</span><span class="w"/><span class="n">tokio</span>::<span class="n">spawn</span><span class="p">(</span><span class="k">async</span><span class="w"/><span class="k">move</span><span class="w"/><span class="p">{</span><span class="w"/></span></span><span class="line"><span class="cl"><span class="w"/><span class="k">while</span><span class="w"/><span class="kd">let</span><span class="w"/><span class="nb">Ok</span><span class="p">(</span><span class="n">msg</span><span class="p">)</span><span class="w"/><span class="o">=</span><span class="w"/><span class="n">chat_rx</span><span class="p">.</span><span class="n">recv</span><span class="p">().</span><span class="k">await</span><span class="w"/><span class="p">{</span><span class="w"/></span></span><span class="line"><span class="cl"><span class="w"/><span class="k">if</span><span class="w"/><span class="n">ws_send</span><span class="w"/></span></span><span class="line"><span class="cl"><span class="w"/><span class="p">.</span><span class="n">send</span><span class="p">(</span><span class="n">Message</span>::<span class="n">Text</span><span class="p">(</span><span class="n">msg</span><span class="p">.</span><span class="n">websocket_reply</span><span class="p">()))</span><span class="w"/></span></span><span class="line"><span class="cl"><span class="w"/><span class="p">.</span><span class="k">await</span><span class="w"/></span></span><span class="line"><span class="cl"><span class="w"/><span class="p">.</span><span class="n">is_err</span><span class="p">()</span><span class="w"/></span></span><span class="line"><span class="cl"><span class="w"/><span class="p">{</span><span class="w"/></span></span><span class="line"><span class="cl"><span class="w"/><span class="k">break</span><span class="p">;</span><span class="w"/></span></span><span class="line"><span class="cl"><span class="w"/><span class="p">}</span><span class="w"/></span></span><span class="line"><span class="cl"><span class="w"/><span class="p">}</span><span class="w"/></span></span><span class="line"><span class="cl"><span class="p">});</span><span class="w"/></span></span></code></pre></div><p>This is basically the same thing, as long as the while loop receives correct messages from the receiving part of the chat backend<code>chat_rx</code>, it will serialize the message to a HTML websocket reply (see above) and send it to the websocket.</p><p>After both tasks are spawned, the<code>websocket_handler</code> function needs to wait for both tasks to finish. If one of them finishes, the other one should be closed as well. You can implement this functionality using the<code>tokio::select!</code> macro:</p><div class="highlight"><pre tabindex="0" class="chroma"><code class="language-rust" data-lang="rust"><span class="line"><span class="cl"><span class="n">tokio</span>::<span class="fm">select!</span><span class="w"/><span class="p">{</span><span class="w"/></span></span><span class="line"><span class="cl"><span class="w"/><span class="n">_</span><span class="w"/><span class="o">=</span><span class="w"/><span class="o">&amp;</span><span class="k">mut</span><span class="w"/><span class="n">chat_to_ws_task</span><span class="w"/><span class="o">=&gt;</span><span class="w"/><span class="n">ws_to_chat_task</span><span class="p">.</span><span class="n">abort</span><span class="p">(),</span><span class="w"/></span></span><span class="line"><span class="cl"><span class="w"/><span class="n">_</span><span class="w"/><span class="o">=</span><span class="w"/><span class="o">&amp;</span><span class="k">mut</span><span class="w"/><span class="n">ws_to_chat_task</span><span class="w"/><span class="o">=&gt;</span><span class="w"/><span class="n">chat_to_ws_task</span><span class="p">.</span><span class="n">abort</span><span class="p">(),</span><span class="w"/></span></span><span class="line"><span class="cl"><span class="p">};</span><span class="w"/></span></span><span class="line"><span class="cl"><span class="n">log</span>::<span class="fm">info!</span><span class="p">(</span><span class="s">"user '{user}' ({id}) left the chat"</span><span class="p">);</span><span class="w"/></span></span><span class="line"><span class="cl"><span class="n">chat</span><span class="p">.</span><span class="n">leave</span><span class="p">(</span><span class="o">&amp;</span><span class="n">user</span><span class="p">).</span><span class="k">await</span><span class="p">;</span><span class="w"/></span></span></code></pre></div><p>Tokio&rsquo;s<code>select!</code> will wait for the first of the tasks to finish. If so, it will kill the other task immediately. This way it makes sure that both tasks are regularly closed and do not remain in the system as zombies. After that, the user is removed from the chatroom to un-reserve the username and close the chat.</p><h2 id="further-reads">Further reads:<a class="heading-anchor" href="#further-reads" aria-hidden="true">#</a></h2><ul><li><a href="https://v1.htmx.org/extensions/web-sockets" target="_blank" rel="noopener">HTMX WebSocket</a></li><li><a href="https://docs.rs/tokio/latest/tokio/sync/broadcast/index.html" target="_blank" rel="noopener">tokio::sync::broadcast</a></li><li><a href="https://docs.rs/axum/0.6.1/axum/extract/ws/struct.WebSocket.html" target="_blank" rel="noopener">axum WebSockets</a></li></ul></content></entry><entry><title>On Apple devices</title><link href="http://blog.koenig.diy/apple_devices_2024/" rel="alternate" type="text/html"/><id>http://blog.koenig.diy/apple_devices_2024/</id><published>2024-03-17T11:17:00+02:00</published><updated>2024-03-17T11:17:00+02:00</updated><content type="html"><p>In the last several months, my iPhone 11 battery got worse and worse. I&rsquo;m not really mad for that, because I think that a reduced battery after 4,5 years constant usage is perfectly fine. Before I bought that phone in late 2019, I was living for a long time in the Android/Windows world. Back then, I was not particularly unhappy, but I wanted to test something different and also wanted something that &ldquo;just works&rdquo;.</p><p>After using Apple throughout the whole pandemic and also switching with most of my devices to apple products I can only say that Apple pretty much fulfills what they promise. That stuff just works. Still, I&rsquo;m not very happy for several reasons with the Apple ecosystem, which I will explain in this text. Still, I won&rsquo;t dump all my apple products immediately.</p><h2 id="what-goes-what-remains">What Goes, What Remains<a class="heading-anchor" href="#what-goes-what-remains" aria-hidden="true">#</a></h2><p>So, what I&rsquo;ve bought in the last years from apple started with an iPhone 11, went on with Airpods Pro, then a Apple Watch Series 6, a used iPad from 2017, and the last thing I bought was a used Macbook Air M1 from 2020. I was quite happy with all of them, nevertheless, some I wouldn&rsquo;t buy again. The main reason is the vendor-lock-in. Let me explain.</p><h3 id="airpods-pro">Airpods Pro<a class="heading-anchor" href="#airpods-pro" aria-hidden="true">#</a></h3><p>Those, I actually did not buy again since they broke literally 2 month after my guarantee ended. As a replacement, I ordered Anker Soundcore Life P3 and I&rsquo;m quite happy with the battery life and sound, for half the price. Also, the main selling points for Airpods, which is the seamless handover between Apple devices never really worked well for me. I didn&rsquo;t really feel locked in with this device, since they also worked with Windows PCs and Android devices.</p><h3 id="apple-watch">Apple Watch<a class="heading-anchor" href="#apple-watch" aria-hidden="true">#</a></h3><p>The Apple Watch is great, but it&rsquo;s just not for me. All the smart features it has I basically never use. I don&rsquo;t use Siri, I deactivated all notifications and uninstalled all apps possible except my sports tracking app Strava. I basically have a very expensive fitness tracker with a lot of additional features I never use, and which I need to recharge every day. And what I want to talk about here especially is vendor locking. If you have such an expensive device and the paired phone breaks, like mine just did, you basically have no choice than buying another iPhone, even if you don&rsquo;t want to. Or you sell you Apple Watch as well which is not a financial desaster, but it feels unnecessary.</p><p>So I decided to switch to a<a href="https://www.garmin.com/de-DE/p/775697/pn/010-02627-00" target="_blank" rel="noopener">Garmin Instinct 2 Solar</a>
. Even though I will keep my iPhone for now. One reason is, that I want to make a decision on a new phone in the upcoming year and I don&rsquo;t want a vendor-lockin to influence my decision. The other reason is that the Instinct 2 is just available at a great price of 250€. On longer bike rides, my Apple Watch actually died multiple times already which is very unfortunate. The Garmin instead, with it&rsquo;s limited display and Solar technology has at least 30 hours battery life on GPS and in theory &ldquo;unlimited&rdquo; battery life through it&rsquo;s solar charge feature. This also seems very sustainable to me.</p><h3 id="iphone-11">iPhone 11<a class="heading-anchor" href="#iphone-11" aria-hidden="true">#</a></h3><p>Positively I can say, that the phone and software<strong>just worked</strong>. And in a very good way. I very rarely had any software issues, nor did I have any problems with the hardware. Now, when I wanted to replace the battery myself, I had to discover again that I&rsquo;m just not made for electronics. Even though the instructions on iFixit were pretty clear, I managed to destroy the screen of the phone by cutting the display cables when removing the glue. So that was stupid, and that&rsquo;s on me. So I now ordered another display to fix it as well.</p><p>But looking at the reparability of the phone I&rsquo;m still not very happy. Sure, I could give it to apple and spend 150€ on a new battery or 300€ on a new display. But I think that replacing a battery should not be a task that involves this amount of work. Which by the way also counts for nearly all Android devices these days.</p><p>Also, monitoring the behaviour of Apple in the last years I&rsquo;m not really happy how they act in fights with the EU. In the &ldquo;charger war&rdquo;, they tried to procrastinate switchting to USB-C for years. There were rumors already on the iPhone 12 to support it, and in the end it came with the 15. Also, Apple shows<a href="https://www.theverge.com/2024/2/15/24074182/apple-drops-support-iphone-web-apps-eu-dma" target="_blank" rel="noopener">childish behaviour</a>
by artificially breaking working functionality for EU users as a revenge to the DMA which was enforced on Apple. Apple obviously does not want me to choose the browser I want to use, Apple does not want me to choose the Store I install apps from. And as a revenge, they just break functionality or<a href="https://www.reddit.com/r/apple/comments/1bex0jc/spotify_says_its_iphone_app_updates_in_the_eu_are" target="_blank" rel="noopener">held up updates for major apps</a>
. It&rsquo;s fine and good that their products just work and have good build quality, but I&rsquo;m currently not willing to accept that I as a customer am constantly patronized by Apple.</p><p>I&rsquo;m currently considering two phone brands from the EU. One is Fairphone from netherlands, and the other one is Shift from germany. Actually, when I bought my iPhone11 in 2019 I also considered both of them, I think the Shiftphone 5me and the Fairphone 3. Back then, the cpus, cameras and also displays were not really up to date, but seemed to be years behind the market. With the<a href="https://shop.fairphone.com/de/fairphone-4-e-operating-system" target="_blank" rel="noopener">Fairphone 4</a>
and<a href="https://shop.shiftphones.com/shift6mq.html" target="_blank" rel="noopener">Shiftphone 6mq</a>
, this changed a lot and both of them got really good feeback on what they did. Late 2023, Fairphone released the<a href="https://shop.fairphone.com/de/fairphone-5" target="_blank" rel="noopener">Fairphone 5</a>
which also got good feedback. Shiftphone will release it&rsquo;s<a href="https://shop.shiftphones.com/shiftphone-8.html" target="_blank" rel="noopener">Shiftphone 8</a>
in August 2024.</p><p>My plan currently is to<strong>wait for the Shiftphone 8, and then decide on a new phone</strong>.</p><h3 id="ipad">iPad<a class="heading-anchor" href="#ipad" aria-hidden="true">#</a></h3><p>This device, I rarely use. It&rsquo;s actually always around the sofa and I use it sometimes to surf while chilling around. I actually bought it used from a friend, but I also don&rsquo;t have any issues with posessing it except the things I already mentioned around iOS and the phone. But I also would most likely not switch it.</p><h3 id="macbook">Macbook<a class="heading-anchor" href="#macbook" aria-hidden="true">#</a></h3><p>Honestly, the Macbook I just love. This is the greatest laptop I ever owned. The build quality is awesome and and the M1 ARM processor is crazy fast. Also, the lock-in topics I mentioned on the iPhone are not remotely as bad on the Mac. I can freely choose a browse which is not running WebKit, I can get root access and even install a Linux OS if I like to.</p><p>The only thing which I maybe do not like that much is the look&amp;feel of MacOS. I regularly use different computers with different operating systems and to me the different keyboad layout to Linux and Windows is just annoying. I would wish that apple would give users the opportunity to select between different keyboad layouts and also Window-Layouts etc. But I think that&rsquo;s a wish that will never be fulfilled. We&rsquo;re still talking about Apple.</p><p>Anyway, that&rsquo;s still not reason for me to get rid of the device by now. I bought it, and I want to keep it for some time longer. I use another Macbook at work for programming, so if I switch my personal one to a linux machine, I still need to cope with the shortcut and keyboard differences all the time.</p><p>Still, similar to the Shift- and Fairphones, there&rsquo;s<a href="https://frame.work" target="_blank" rel="noopener">Framework</a>
, which are building highly repariable computers for end consumers. Maybe, in a few years, when I have the chance to switch my work device, I will ask for a non-mac laptop and also switch to a frame-work as my private device then.</p><h2 id="conclusion">Conclusion<a class="heading-anchor" href="#conclusion" aria-hidden="true">#</a></h2><p>In conclusion, my experience with Apple products over the years has been a mix of satisfaction and frustration. While I appreciate their reliability and durability, I&rsquo;m increasingly wary of the limitations and costs associated with the Apple ecosystem. As I look towards the future, I&rsquo;m inclined to explore alternatives that offer more flexibility and affordability. By gradually transitioning away from Apple, I hope to regain control over my device choices and minimize the influence of vendor lock-in.</p><ul><li>Tobi</li></ul></content></entry><entry><title>On screens and productivity</title><link href="http://blog.koenig.diy/screens_productivity/" rel="alternate" type="text/html"/><id>http://blog.koenig.diy/screens_productivity/</id><published>2024-03-16T09:30:00+02:00</published><updated>2024-03-16T09:30:00+02:00</updated><content type="html"><h2 id="introduction">Introduction<a class="heading-anchor" href="#introduction" aria-hidden="true">#</a></h2><p>I know there are several studies which show that<a href="https://www.fujitsu.com/de/about/resources/news/press-releases/2021/20210222.html" target="_blank" rel="noopener">multimonitor setups increase office workers&rsquo; productivity</a>
. I myself have often had doubts about those studies. In the linked case, the &ldquo;study&rdquo; was based on a survey of ~2000 people working in offices. The productivity was &ldquo;measured&rdquo; by self-evaluation of those people. So, you don&rsquo;t know if they were really more productive or if they just felt that way.</p><p>Another question I have for this specific study is whether the &ldquo;second monitor&rdquo; is actually a real physical monitor with 24"+ added to the prior single monitor, which was the laptop. The press release does not make that clear. To me, it is obvious that if you add a mouse, a keyboard, and a monitor to your laptop, your productivity will increase, even if you stay in single-monitor mode on the larger screen and close the laptop, like I do most of the time.</p><h2 id="definitions">Definitions<a class="heading-anchor" href="#definitions" aria-hidden="true">#</a></h2><p>Let me clarify some terms I will be using in the following text:</p><ul><li><strong>0.5 screen setup</strong>: The typical laptop. This is fine if you are currently traveling, but I don&rsquo;t see how you can be productive for a longer time just on your laptop screen.</li><li><strong>1 screen setup</strong>: One larger screen with good ergonomic positioning in front of your face.</li><li><strong>1.5 screen setup</strong>: One larger screen with the laptop screen.</li><li><strong>multi-screen setup</strong>: 2+ larger screens.</li></ul><p>Basically, I see a normal computer monitor as one screen and a laptop as 0.5. An ultrawide screen, to me, is also like 1.5 monitors.</p><h2 id="wheres-the-benefit">Where&rsquo;s the Benefit<a class="heading-anchor" href="#wheres-the-benefit" aria-hidden="true">#</a></h2><p>For many workloads, I totally see the benefit, especially if you compare things at all levels. Examples include:</p><ul><li>A frontend developer who has the code on one side and the open browser with live-refresh on the other.</li><li>A support engineer who has logs on one side and code on the other.</li><li>&ldquo;Business-stuff&rdquo; tasks, such as comparing an Excel sheet with a PDF or another Excel sheet.</li><li>Online presentations where you share one screen and use the other to see your notes.</li></ul><p>These are typical workloads I have, where I also use two monitors, and I totally see the benefit. But to me, this is maybe 10% of the day.</p><h2 id="whats-the-cost">What&rsquo;s the Cost<a class="heading-anchor" href="#whats-the-cost" aria-hidden="true">#</a></h2><p>Now, what&rsquo;s the cost when using multiple monitors? I currently see three cost factors:</p><p><strong>Initial cost</strong>: The cost to buy a monitor. I don&rsquo;t think you should try to save a lot of money here since, in my opinion, a good monitor is crucial for a productive working day.</p><p><strong>Running cost</strong>: Energy consumption. I think here you can and should actually save money. People often underestimate the running cost of a monitor, especially if they have higher refresh rates of 120Hz or more. So, if you are currently just using one of them, try turning off the other one for a moment. It will help your electricity bill, and it will help you with:</p><p><strong>Stress cost</strong>: This is a very subjective thing, so I will write down my personal view here. Very often, having multiple monitors turned on while only using one of them causes me a lot of distraction and stress. This could be due to:</p><ul><li>Messages in Slack.</li><li>Emails.</li><li>News popping up.</li><li>Other documents or code which I currently don&rsquo;t look at, but are still constantly on my mind because I see them in peripheral sight.</li></ul><h2 id="my-setup">My Setup<a class="heading-anchor" href="#my-setup" aria-hidden="true">#</a></h2><p>So, I&rsquo;m currently running the 1.5 monitors setup everywhere. I would say that 90% of the day, the laptop lid is closed, and I only use one monitor. But for some workloads, I totally see the benefit of two monitors, and that&rsquo;s when I usually open the laptop lid and use it as a second screen.</p><p>To me, having two &ldquo;real&rdquo; screens always on was, in the end, more of a distraction and damaged my workflow than I had any benefits from. But I also don&rsquo;t like working with only one screen all the time, so I currently see the 1.5 monitor setup as perfect.</p><h2 id="conclusion">Conclusion<a class="heading-anchor" href="#conclusion" aria-hidden="true">#</a></h2><p>In my observations of other people I work with and mentor, I see that some are really keeping up productivity with three monitors and also often use all three of them. Usually, those are people who also have better capabilities to multitask than I have. But I also mentored someone who told me that they felt distracted all the time and had difficulties focusing on their tasks. So I recommended to them what helped me: Stop multitasking. Try to split your workday into slots of X minutes, whatever fits for you, and just work on a single thing during that time. If you choose something like 20-30 minutes, then there&rsquo;s basically no message you can&rsquo;t wait to respond to until your slot ends. If you then choose to use only one monitor, you are also not distracted by any Slack messages on the second one. What I also use a lot is workspaces. By now, Linux, Mac, and Windows all support them. Usually, I have a cluttered workspace with mail, Slack, and other programs. And when I work with code, I am on a separate workspace.</p><p>I think this is a very subjective topic, and everybody should do what fits their needs the most. To me, it turned out that multiple monitors are often just too distracting. Sometimes for unnecessary &ldquo;media stuff,&rdquo; but sometimes also the &ldquo;work on idle&rdquo; on the other screen is constantly putting jitter in my brain. That&rsquo;s why I ended up using just one monitor with the optional laptop screen if needed.</p></content></entry><entry><title>Idleness</title><link href="http://blog.koenig.diy/idleness/" rel="alternate" type="text/html"/><id>http://blog.koenig.diy/idleness/</id><published>2024-03-15T14:18:00+02:00</published><updated>2024-03-15T14:18:00+02:00</updated><content type="html"><p><em>disclaimer</em>:
I&rsquo;m currently testing around a bit with AI generated content and thought it&rsquo;s a good experiment to make ChatGPT write an article about the &ldquo;idleness&rdquo; topic. The inspiration for the topic I got from the german book called &ldquo;Das Beste was wir tun können ist nichts&rdquo;, which freely translates to &ldquo;best we can do is nothing&rdquo;.</p><p>In general, I like what ChatGPT wrote about idleness. In the first place, I wanted to also talk more about what consequences idleness can have on your personal life, but unfortunately, ChatGPT focussed a lot on career and work life. I know, that I could&rsquo;ve continued talking to ChatGPT to make it implement those changes, but currently I try to minimize the talking in those prompts.</p><p>My 5 cents: I really liked the book I read about idleness, but I think the author is somehow praising the concept too high. There were situations in the past in my life, where I think I should&rsquo;ve acted earlier, but thereare also many examples in which I shouldn&rsquo;t have acted at all. Especially in work life and since I&rsquo;m working in more kind of a &ldquo;core role&rdquo; in my company, I learned that I don&rsquo;t need to act on every slack message I get, but sometimes you need to wait a little because the people will come a few minutes later saying &ldquo;oh nevermind, I think it&rsquo;s not that imporant right now&rdquo;. So, sometimes, just stay calm and idle 😉.</p><h1 id="chatgpt-35">ChatGPT (3.5):<a class="heading-anchor" href="#chatgpt-35" aria-hidden="true">#</a></h1><h2 id="the-virtue-of-idleness-embracing-patience-in-life">The Virtue of Idleness: Embracing Patience in Life<a class="heading-anchor" href="#the-virtue-of-idleness-embracing-patience-in-life" aria-hidden="true">#</a></h2><p>In a world that celebrates productivity and action, the concept of idleness often receives a negative connotation. However, there is a profound wisdom in the art of idleness, in patiently waiting for things to unfold rather than rushing into immediate action. This essay explores the notion of idleness as a virtue, discussing its potential benefits in life while also addressing the dangers of prolonged inactivity.</p><p>At first glance, idleness may seem counterproductive, but upon closer examination, it reveals itself as a powerful tool for personal growth and development. Embracing idleness allows individuals to cultivate patience and mindfulness. By refraining from immediate action, one can gain a deeper understanding of oneself and the world around them. Idleness provides the space for reflection, introspection, and creativity to flourish. It allows ideas to germinate and solutions to emerge naturally, rather than being forced.</p><p>Moreover, idleness serves as a counterbalance to the relentless pace of modern life. In a society that glorifies busyness, taking moments of idleness can be a radical act of self-care. It offers respite from the constant pressure to achieve and allows individuals to reconnect with their inner selves. Books such as &ldquo;The Art of Stillness: Adventures in Going Nowhere&rdquo; by Pico Iyer delve into the transformative power of stillness and idleness in a fast-paced world.</p><p>While idleness has its merits, it is essential to acknowledge the potential dangers of excessive passivity. Prolonged periods of inactivity can lead to stagnation and complacency. Without goals or aspirations to pursue, individuals may find themselves trapped in a cycle of apathy and disengagement from life. This can ultimately result in missed opportunities for growth and fulfillment.</p><p>Furthermore, idleness can foster a sense of entitlement or unrealistic expectations. Waiting for things to happen without putting in the necessary effort can lead to disappointment and disillusionment. Books like &ldquo;The War of Art: Break Through the Blocks and Win Your Inner Creative Battles&rdquo; by Steven Pressfield explore the dangers of procrastination and the importance of taking action in pursuit of one&rsquo;s goals.</p><p>In conclusion, the concept of idleness offers valuable insights into the nature of human existence. By embracing moments of stillness and waiting for things to unfold, individuals can cultivate patience, mindfulness, and creativity. However, it is essential to approach idleness with caution and awareness of its potential pitfalls. By finding a balance between patience and action, one can harness the power of idleness to lead a more fulfilling and meaningful life.</p><p><a href="https://chat.openai.com/share/fdc52647-6823-43e2-8fc9-c8c16ed2a760" target="_blank" rel="noopener">Link to ChatGPT Prompt</a>
.</p></content></entry><entry><title>Essentialism, Minimalism and Capitalism</title><link href="http://blog.koenig.diy/minimalism_and_essentialism/" rel="alternate" type="text/html"/><id>http://blog.koenig.diy/minimalism_and_essentialism/</id><published>2023-10-17T15:00:00+02:00</published><updated>2023-10-17T15:00:00+02:00</updated><summary>Navigate Essentialism and Minimalism, exploring their impact on lifestyle, philosophy, and the nuances of capitalism. A critical examination.</summary><content type="html"><p>In the last years I read a lot about the concepts of essentialism and minimalism and somehow identify with the ideas. But I would like to answer the question for me if I&rsquo;m a minimalist or essentialist. For a while I&rsquo;m wondering in how far both concepts can be distinguished. I have my on thoughts on it on how to do that, but I would like to check in this blog entry if I&rsquo;m right or wrong about it. The generalized statement of both is pretty much the same:</p><blockquote><p>Have a higher quality in life by doing and owning just what&rsquo;s really important for you.</p></blockquote><h2 id="general">General<a class="heading-anchor" href="#general" aria-hidden="true">#</a></h2><p>Minimalism as a lifestyle is often accused to be more or less just a tool of<a href="https://shoshanazuboff.com/book" target="_blank" rel="noopener">surveillance or attention capitalism</a>
to keep people on consuming facebook, instagram and tiktok feeds of the<a href="https://www.theminimalists.com" target="_blank" rel="noopener">bigger minimalism influencers</a>
. I&rsquo;ve rarely seen minimalists recommending their listeners or readers to just quit the media they are delivering on. Which makes a lot of sense because most of those influencers by now make their money with social media content, so telling your audience to leave your platform can be very counter productive for your personal wallet. On the other hand, you&rsquo;re a minimalist so money is not that important, is it? In fact, sometimes I get the impression that you cannot be a minimalist without having some kind of social media presence, blog or podcast to sell courses and books. And you find just<strong>lots</strong> of it.</p><p>On the other hand I rarely find something on the label essentialism, and rarely people identify as &ldquo;essentialist&rdquo;, at least it seems to be less common than for minimalists. One of my first books I read about those concepts was called &ldquo;essentialism&rdquo; by Greg McKeown. A book of which I have mixed feelings about because a huge part of why it tells you to try the essentialism lifestyle is your work. So the main question after reading the book was: what is this<strong>really</strong> about? Living a better life or<em>being more effective at work</em>? Yes, please understand this as another critique on capitalism buying and reselling lifestyles.</p><p>Fortunately, essentialism has a much longer track record than minimalism. Philosophically seen,<a href="https://en.wikipedia.org/wiki/Essentialism" target="_blank" rel="noopener">essentialism</a>
is the view that every object has a set of attributes that are focal to their identity. This means that the essence is basically a combination of substance and form analog to ideas and forms in Platons idealism. So it&rsquo;s basically a philosophical view that everything can be abstracted to some specific core attributes. Once you replace &ldquo;everything&rdquo; with &ldquo;everyone&rdquo; or even groups of people, this can easily drift into generalizations and the<a href="https://theanarchistlibrary.org/library/lawrence-jarach-essentialism-and-the-problem-of-identity-politics" target="_blank" rel="noopener">danger of racism and fueling identity politics</a>
.</p><h2 id="what-i-think">What I think<a class="heading-anchor" href="#what-i-think" aria-hidden="true">#</a></h2><p>I think, minimalism is about<strong>things</strong>, and essentialism is about a wholistic view on your mind. Even if the influencer-minimalists would argue differently. Actually, I think that essentialism is, what minimalism want&rsquo;s to be. Why?</p><p>Minimalism to me appears as a capitalist lifestyle which does basically identify by having just a few, but very intentional (and luxurious) things. Following minimalist influencers for a while, you will see that they do not own a lot of stuff, buf what they own is usually<em>ridiculously</em> expensive and also show off with those a lot. Also, they usually justify each of their belongings by the quality of the product, how it is the best product in it&rsquo;s category and how much it &ldquo;brings joy&rdquo; to their lifes. But most of it still seems to be about<strong>things</strong> instead of work, private life etc. And the main reason for this is the big minimalism industry which basically - contrary to what they say - talk about things and stuff over and over.</p><p>Essentialism as a lifestyle instead seems to provide what minimalism fails to - by actually delivering<strong>less</strong> content. I actually had a hard time finding online content on essentialism - which makes sense since the essentialists are probably focussing on essential things in their lifes instead of just producing video over video and hosting it on social media platforms which make their money by selling products to the audience. One thing you have to keep in mind when implementing a essentialist view on the world is that the belief that everthing is deducible to some core attributes can also lead to prejudice.</p><h2 id="what-chatgpt-thinks">What ChatGPT thinks<a class="heading-anchor" href="#what-chatgpt-thinks" aria-hidden="true">#</a></h2><p>Wouldn&rsquo;t this be interesting?</p><blockquote><p>Essentialism and minimalism are two distinct concepts, often associated with different aspects of life, philosophy, and design. Here&rsquo;s an overview of each term:</p></blockquote><blockquote><p>Essentialism:</p><ul><li>In Philosophy: Essentialism is a philosophical concept that suggests that entities have inherent, fundamental qualities or characteristics that define their essence. This view holds that things have a set of properties that make them what they are, and these properties are necessary for the existence of the entity.</li><li>In Education: Essentialism in education advocates for a focus on essential skills and knowledge that are deemed necessary for students. It emphasizes a core curriculum that often includes subjects like mathematics, science, literature, and history.</li><li>In Personal Development: Essentialism in personal development is a mindset that encourages individuals to identify and focus on what is truly essential in their lives. It involves prioritizing activities and commitments that align with one&rsquo;s values and goals while eliminating non-essential distractions.</li></ul></blockquote><blockquote><p>Minimalism:</p><ul><li>In Art and Design: Minimalism is an art and design movement characterized by simplicity, clean lines, and a focus on essential elements. It involves using the bare minimum of components, such as color, shape, and form, to convey a message or create an aesthetic experience.</li><li>In Lifestyle: Minimalism as a lifestyle advocates for simplifying one&rsquo;s life by decluttering physical possessions and focusing on experiences rather than material possessions. The goal is to eliminate the excess and only keep what is truly valuable or necessary.</li><li>In Technology: Minimalism in technology refers to designing products and interfaces with a minimalistic approach, often emphasizing simplicity and ease of use. This can apply to both hardware and software design.</li></ul></blockquote><blockquote><p>In summary, while essentialism is a philosophical concept that deals with inherent qualities and the core nature of things, minimalism is often a design or lifestyle choice that emphasizes simplicity and the elimination of excess. Essentialism is more about identifying and focusing on the essential qualities, while minimalism is about reducing to the essential elements or components.</p></blockquote><p>So it seems that ChatGPT comes to an additional conclusion. Also notice, how the points in essentialism are about thoughts and ideas, while for minimalism it&rsquo;s about things: art &amp; design, technology. Both have &ldquo;lifestyle&rdquo;.</p></content></entry><entry><title>Blogroll</title><link href="http://blog.koenig.diy/about/blogroll/" rel="alternate" type="text/html"/><id>http://blog.koenig.diy/about/blogroll/</id><published>2023-10-14T22:00:00+02:00</published><updated>2023-10-14T22:00:00+02:00</updated><content type="html"><h2 id="articles">Articles<a class="heading-anchor" href="#articles" aria-hidden="true">#</a></h2><ul><li><a href="https://renegadeotter.com/2023/09/10/death-by-a-thousand-microservices.html" target="_blank" rel="noopener">Death by a thousand microservices</a></li><li><a href="https://www.benkuhn.net/listen" target="_blank" rel="noopener">To listen well, get curious</a></li><li><a href="https://www.benkuhn.net/attention" target="_blank" rel="noopener">Attention is your scarcest resource</a></li><li><a href="https://youdontneedamodalwindow.dev" target="_blank" rel="noopener">You don&rsquo;t need a modal window</a></li><li><a href="https://www.radicalsimpli.city" target="_blank" rel="noopener">Radical simplicity in technology</a></li><li><a href="https://www.amazingcto.com/postgres-for-everything" target="_blank" rel="noopener">Just use Postgres for everything</a></li><li><a href="https://trojanczyk.eu/crisis-in-the-it-industry" target="_blank" rel="noopener">Recession and crisis in the IT industry</a></li><li><a href="https://ludic.mataroa.blog/blog/quitting-my-job-for-the-way-of-pain" target="_blank" rel="noopener">Quitting My Job For The Way Of Pain</a></li></ul><h2 id="blogs">Blogs<a class="heading-anchor" href="#blogs" aria-hidden="true">#</a></h2><h3 id="general">General<a class="heading-anchor" href="#general" aria-hidden="true">#</a></h3><ul><li><a href="https://world.hey.com/jason" target="_blank" rel="noopener">Jason Fried</a>
- I like Jasons concepts of how to structure companies and workload. He funded the company behind basecamp together with David Heinemeier Hansson.</li><li><a href="https://www.benkuhn.net" target="_blank" rel="noopener">Ben Kuhn</a>
- I had an interview with Ben when he was the CTO of<a href="https://wave.com" target="_blank" rel="noopener">wave</a>
, a finance startup from Senegal. He&rsquo;s a really great and respectful guy and I really appreciate the hour talk that we had. Since then, I regularly check his blog.</li></ul><h3 id="tech">Tech<a class="heading-anchor" href="#tech" aria-hidden="true">#</a></h3><ul><li><a href="https://world.hey.com/dhh" target="_blank" rel="noopener">David Heinemeier Hansson</a>
- 37signals co-owner and also long-year blogger. Some of his takes I like, some I don&rsquo;t. But it&rsquo;s always nice to read differnent opinions as well.</li><li><a href="https://denizaksimsek.com/en" target="_blank" rel="noopener">Deniz Aksimsek</a>
- A guy who&rsquo;s active in the indieweb and htmx community. Actually, when I bought the<a href="https://hypermedia.systems" target="_blank" rel="noopener">Hypermedia Systems</a>
book he co-authored, I checked his website and discovered the indieweb. So Deniz, thanks a lot 🙇‍♂️.</li><li><a href="https://thejpster.org.uk" target="_blank" rel="noopener">Jonathan Pallant</a>
- When you do things with Rust and embedded systems, you should have heard about Jonathan.</li><li><a href="https://oida.dev" target="_blank" rel="noopener">fettblog.eu</a>
- I&rsquo;m confused you can use fettblog.eu and oida.dev. Wondering with how many Domains Stefan can come up.</li><li><a href="https://dirkjan.ochtman.nl" target="_blank" rel="noopener">Dirkjan Ochtman</a>
- Creator of Askama Templating engine</li><li><a href="https://lucumr.pocoo.org" target="_blank" rel="noopener">Armin Ronacher</a>
- As well as Ben, Armin is a techie under the &ldquo;general&rdquo; section as well, because I absolutely love reading his takes on life and work.</li><li><a href="https://ludic.mataroa.blog" target="_blank" rel="noopener">Nikhil Suresh</a>
- Really cool writing style and great tech articles such as &ldquo;I Will Fucking Piledrive You If You Mention AI Again&rdquo;</li></ul></content></entry><entry><title>Now</title><link href="http://blog.koenig.diy/about/now/" rel="alternate" type="text/html"/><id>http://blog.koenig.diy/about/now/</id><published>2023-10-14T20:01:15+02:00</published><updated>2023-10-14T20:01:15+02:00</updated><content type="html"><h2 id="indieweb--basic-internet-technologies">Indieweb &amp; basic internet technologies<a class="heading-anchor" href="#indieweb--basic-internet-technologies" aria-hidden="true">#</a></h2><h3 id="indieweb">Indieweb<a class="heading-anchor" href="#indieweb" aria-hidden="true">#</a></h3><p>I&rsquo;m currently reading a lot about the Indieweb. Basically the indieweb is the internet how it was meant to be. Decentralized and owned by<strong>many</strong> people and not<a href="https://www.makeuseof.com/who-owns-the-internet" target="_blank" rel="noopener">a hand full of companies</a>
. As the linked articles says, the internet hardware is bascially owned by very few telecommunication companies per country and it&rsquo;s software (and also data!) is controlled by basically just a few companies (google, facebook, microsoft).</p><p>The indieweb is a movement against that. I&rsquo;m currently exploring a lot and it&rsquo;s just fascinating and great and brings back some early 2000s vibes for me.</p><h3 id="freelancing-and-rust-trainings">Freelancing and Rust trainings<a class="heading-anchor" href="#freelancing-and-rust-trainings" aria-hidden="true">#</a></h3><p>I also try to do freelance projects using Rust and also get some gigs to do my async-Rust trainings based on my<a href="https://github.com/tsmt09/tokio-web-demo" target="_blank" rel="noopener">tokio-web-demo</a>
.</p><h3 id="basic-tech">Basic tech<a class="heading-anchor" href="#basic-tech" aria-hidden="true">#</a></h3><p>Besides the Indieweb, I&rsquo;m currently exploring<em>basic internet technologies</em>. What I mean with this is that in the last years I got pretty disconnected with a huge part of web development which is the frontend.</p><p>I have this<a href="https://github.com/tsmt09/mqttpal" target="_blank" rel="noopener">mqttpal</a>
side project, which is basically meant to be a debugging and statistics webserver for &ldquo;mosquitto&rdquo; and other mqtt brokers. My goal is to build a very dynamic website supporting technologies such as websockets for live debugging of MQTT Topics, while not making use of any single page application framework such as React or Vue. To do that, I make use of:</p><ul><li><a href="https://actix.rs" target="_blank" rel="noopener">Actix-Web</a>
for the backend</li><li><a href="https://djc.github.io/askama/askama.html" target="_blank" rel="noopener">Askama</a>
as templating engine</li><li><a href="https://htmx.org" target="_blank" rel="noopener">HTMX</a>
and<a href="https://hyperscript.org" target="_blank" rel="noopener">hyperscript</a>
to implement a dynamic frontend</li></ul></content></entry><entry><title>Switching from Hugo to Zola</title><link href="http://blog.koenig.diy/switch_zola/" rel="alternate" type="text/html"/><id>http://blog.koenig.diy/switch_zola/</id><published>2023-10-14T16:15:25+02:00</published><updated>2023-10-14T16:15:25+02:00</updated><content type="html"><h2 id="general">General<a class="heading-anchor" href="#general" aria-hidden="true">#</a></h2><p>Today I switched the blogs page from<a href="https://gohugo.io" target="_blank" rel="noopener">Hugo</a>
to<a href="https://getzola.org" target="_blank" rel="noopener">Zola</a>
.</p><p>While Hugo was a great experience, I always thought that it might be very over the top of what I want to do. This is not some kind of simple content management system for me, but I also plan to fiddle around a little bit with the static site internet, especially HTML and CSS.</p><p>So the benefits to Hugo I see are:</p><ul><li>Due to my job I&rsquo;m familiar with the great<a href="https://keats.github.io/tera/docs/#getting-started" target="_blank" rel="noopener">Tera</a>
templating engine.</li><li>Zola is written in Rust 🦀! It&rsquo;s probably not that I would ever need to make changes, but if so, it would be much easier for me to contribute.</li><li>Simplicity. Hugo is great. But hugo is also just large. Zend isn&rsquo;t.</li></ul><h2 id="todo">ToDo<a class="heading-anchor" href="#todo" aria-hidden="true">#</a></h2><p>This is a living document, so you can read my todo list here:</p><ul><li><input checked="" disabled="" type="checkbox"> About Page</li><li><input checked="" disabled="" type="checkbox"> Blog Pages</li><li><input checked="" disabled="" type="checkbox"> GitLab Integration (yes, this page is hosted on<a href="https://gitlab.com/tsmt/tobischmitt.net" target="_blank" rel="noopener">GitLab Pages</a>
)</li><li><input checked="" disabled="" type="checkbox"> Taxonomies</li><li><input checked="" disabled="" type="checkbox"> Top Navigation</li><li><input checked="" disabled="" type="checkbox"> Basic CSS</li><li><input checked="" disabled="" type="checkbox"> RSS feeds</li><li><input checked="" disabled="" type="checkbox"> Extra: Dark mode<em>(this was much easier than I thought!)</em></li></ul><h2 id="summary">Summary<a class="heading-anchor" href="#summary" aria-hidden="true">#</a></h2><p>A few hours later and I&rsquo;m done. It&rsquo;s basically crazy how few steps I needed to move my personal homepage from Hugo to Zola. The basic steps I took today:</p><ul><li>Save<code>content/</code> folder, delete all hugo files.</li><li>Install and init a<code>zola</code> project.</li><li>Realize that basically everything except<code>tags</code> work. Great 😮!<ul><li>this might be due to the fact that I used basically no hugo features. If you have bigger and more extensive sites, this might be much more difficult for you!</li></ul></li><li>try out some templates and realize I don&rsquo;t like them.</li><li>Read the<a href="https://www.getzola.org/documentation/templates/overview" target="_blank" rel="noopener">great documentation</a>
about templates.</li><li>spend a few hours writing a basic setup</li></ul><p>What should I say? I&rsquo;m pretty happy. While I was developing the template, I tried to read a lot about how to write a simplistic website and ended up with a<a href="https://brutalist-web.design/#" target="_blank" rel="noopener">great website about brutalist web design</a>
. While I did not implement all points yet, I like how fast you can go forward if you apply simple principles and keep the<a href="http://blog.koenig.diy/blog/barely-complex-yet-primitive" data-rel="prefetch">complexity of your projects</a>
small.</p></content></entry><entry><title>Barely complex enough, yet as primitive as possible</title><link href="http://blog.koenig.diy/barely_complex_yet_primitive/" rel="alternate" type="text/html"/><id>http://blog.koenig.diy/barely_complex_yet_primitive/</id><published>2023-08-22T23:14:53+02:00</published><updated>2023-08-22T23:14:53+02:00</updated><content type="html"><p>This will be the first post for an ongoing series I want to write on what makes a software well designed or not. Of course, I&rsquo;m clear that this is probably one of 1203901831 articles of this kind in the internet. But as everything in this blog, this is also just about writing things down which helps me personally to find my own opinion to those things.</p><p>As mentioned in the<a href="http://blog.koenig.diy/about" data-rel="prefetch">about me</a>
page, &ldquo;gude&rdquo; is a typical colloquial language to say &ldquo;hi&rdquo; in german. Gude is rooted from &ldquo;gut&rdquo;, which is good in english.</p><p>There&rsquo;s a whole philosophy on good and you can probably discuss this in a whole semester of philosophy courses and still discuss if we talking on good as in good food, or good as in public good? Let&rsquo;s start with todays statement:</p><h1 id="barely-complex-enough-yet-as-primitive-as-possible">Barely complex enough, yet as primitive as possible<a class="heading-anchor" href="#barely-complex-enough-yet-as-primitive-as-possible" aria-hidden="true">#</a></h1><p>This is somehow the obvious &ldquo;KISS&rdquo; statement. Don&rsquo;t try to overcomplicate things. Also, one of my learnings is to not abstract too more than you need to. If you want to solve a specific business purpose, then solve it. Don&rsquo;t think too much about what else could be solved if you would just make the whole code more abstract and generic, if you don&rsquo;t have a specific usecase for it.</p><p>Example:
My task is to write a little app which is able to store books into a database and has a web frontend for this. Nothing else needed since it&rsquo;s just running on a single users local machine at the library next door.</p><p><strong>Best design: I find an existing solution for it, which is well designed.</strong></p><p><em>Good design</em>: I chose my favourite tool and wrote a GUI which is able to give a simple local book database management to the librarian. Stored in a file, backed up on a NAS or Dropbox or whatever.</p><p><em>Bad design</em>: I&rsquo;m the best programmer in the world. So I added usermangement and additionally to that I made the storing of objects in the database generic, so you can store any object you like. This brings no obvious feature for the user, but we can later extend it easily. Data is stored in some SQL database on some cloud hoster so it&rsquo;s accessible everywhere. It just took me 2 weeks.</p><p>What I solved with the bad design solution is a whole different task, which is: write an application with usermanagement which is able to store any kind of objects into a SQL database table, which is hosted in a cloud environment.</p><p>This is not just bad because I took more time for the implementation than necessary, but also because all those little features I added because I love my tools and I want to show what I&rsquo;m capable of. One rule of thumb I learned is that features always lead to more features. And feature is complexity. So complexity leads to complexity. And as<a href="https://grugbrain.dev/#grug-on-complexity" target="_blank" rel="noopener">as we learned from grugbrain</a>
: complexity very, very bad.</p><p><strong>By the way talking about features leading to features. I introduced usermanagement, right? What about permissions now? Do we need roles?</strong> You see, features lead to features. And features are complexity.</p></content></entry><entry><title>Babysteps with Embedded Rust and RPi Pico</title><link href="http://blog.koenig.diy/creating_embedded_rust_project/" rel="alternate" type="text/html"/><id>http://blog.koenig.diy/creating_embedded_rust_project/</id><published>2023-03-19T12:33:23+01:00</published><updated>2023-03-19T12:33:23+01:00</updated><content type="html"><p>At the moment, I&rsquo;m working both with Raspberry Pi Picos in Embedded projects and Rust in System Software Projects. Today, I would like to test out the embedded capabilities of the Rust programming language and deploy some Rust embedded<code>#![no_std]</code> code to a<a href="https://www.raspberrypi.com/documentation/microcontrollers/raspberry-pi-pico.html" target="_blank" rel="noopener">Raspberry Pi Pico</a>
.</p><p>One motivation I have for this tutorial is, that there are several good tutorials on embedded Rust, but all of them provide some kind of predefined repository. While I don&rsquo;t want to complain about this at all and we all should be really greatful by the learning material that the Rust community is giving to us, I personally like it more to build up on a mostly empty repository, to learn exactly where we are coming from. So I personally plan to do this just as some kind of minimal project with a blinking example. Once I will go for more sophisticated projects, I will go and work with predefined repositories since they have much more capabilities than this project has.</p><p>Again, I&rsquo;m writing this tutorial from a Macbook with Apple Silicon, so some things might be different in Linux or Windows.</p><h1 id="prerequisites">Prerequisites<a class="heading-anchor" href="#prerequisites" aria-hidden="true">#</a></h1><p>Let&rsquo;s assume you have the following installed:</p><ul><li><strong>Rustup</strong>, the installer for the Rust programming language:<a href="https://rustup.rs" target="_blank" rel="noopener">Rustup</a></li><li>A compatible code editor. With Rust, I had a lot of success with<a href="https://code.visualstudio.com" target="_blank" rel="noopener">Visual Studio Code</a>
and it&rsquo;s<a href="https://marketplace.visualstudio.com/items?itemName=swellaby.rust-pack" target="_blank" rel="noopener">Rust Extension Pack</a>
(including the very important<code>rust-analyzer</code>).</li><li>You&rsquo;ve done the<a href="https://datasheets.raspberrypi.com/pico/getting-started-with-pico.pdf" target="_blank" rel="noopener">Chapter 1. Quick Pico Setup</a>
from the official Raspberry Pi Pico installation Guide.</li></ul><p>Done that? Good! Let&rsquo;s roll!</p><h2 id="creating-the-rust-project">Creating the Rust Project<a class="heading-anchor" href="#creating-the-rust-project" aria-hidden="true">#</a></h2><p>Rust projects are managed with a tool called<code>cargo</code>. Cargo is a package and repository manager for the Rust ecosystem and gives you a lot of help around dependency management, testing, linting (clippy), and formatting (rust-fmt). I would always highly recommend going with cargo. So first, create a new project in a directory of your choice, for me it&rsquo;s<code>~/code/pico</code></p><div class="highlight"><pre tabindex="0" class="chroma"><code class="language-bash" data-lang="bash"><span class="line"><span class="cl"><span class="nb">cd</span> ~/code/pico</span></span><span class="line"><span class="cl">cargo init blink-rs</span></span></code></pre></div><p>Cargo should&rsquo;ve created a folder now called<code>blink-rs</code>. You can open that directory now with VSCode<code>nvim blink-rs</code>.</p><p>Open the<code>src/main.rs</code> file which is always the entry point for a<code>binary crate</code>. A<code>crate</code> is a package in rust, and a binary crate is therefore a package which builds an executable. There are also library crates, which are supposed to build, yes you guessed it, libraries ;-). You will see this:</p><p><code>src/main.rs</code></p><div class="highlight"><pre tabindex="0" class="chroma"><code class="language-rust" data-lang="rust"><span class="line"><span class="cl"><span class="k">fn</span><span class="nf">main</span><span class="p">()</span><span class="w"/><span class="p">{</span><span class="w"/></span></span><span class="line"><span class="cl"><span class="w"/><span class="fm">println!</span><span class="p">(</span><span class="s">"Hello, world!"</span><span class="p">);</span><span class="w"/></span></span><span class="line"><span class="cl"><span class="p">}</span><span class="w"/></span></span></code></pre></div><p><code>Cargo.toml</code></p><div class="highlight"><pre tabindex="0" class="chroma"><code class="language-toml" data-lang="toml"><span class="line"><span class="cl"><span class="p">[</span><span class="nx">package</span><span class="p">]</span></span></span><span class="line"><span class="cl"><span class="nx">name</span><span class="p">=</span><span class="s2">"blink-rs"</span></span></span><span class="line"><span class="cl"><span class="nx">version</span><span class="p">=</span><span class="s2">"0.1.0"</span></span></span><span class="line"><span class="cl"><span class="nx">edition</span><span class="p">=</span><span class="s2">"2021"</span></span></span><span class="line"><span class="cl"/></span><span class="line"><span class="cl"><span class="c"># See more keys and their definitions at https://doc.rust-lang.org/cargo/reference/manifest.html</span></span></span><span class="line"><span class="cl"/></span><span class="line"><span class="cl"><span class="p">[</span><span class="nx">dependencies</span><span class="p">]</span></span></span></code></pre></div><p>If you run<code>cargo run</code> in your console now, Cargo should compile a binary and write<code>Hello World!</code> to your terminal. If this is the case, all is good.</p><h2 id="how-to-bring-this-to-the-pico">How to bring this to the Pico?<a class="heading-anchor" href="#how-to-bring-this-to-the-pico" aria-hidden="true">#</a></h2><p>In our current state, we have a Rust program which makes use of rusts<code>libstd</code>, which brings<strong>a lot</strong> of capabilites to work together with operating systems. If we would use an Embedded System which runs Embedded Linux for example, this would already be enough because the Kernel would abstract all hardware for us:</p><pre tabindex="0"><code> ┌───────┐ ┌──────┐ ┌──────┐ ┌────────┐
│main.rs├──►│libstd├───►│kernel├──►│hardware│
└───────┘ └──────┘ └──────┘ └────────┘</code></pre><p>Since we want to run our software natively for the Raspberry Pi Pico, and usually there is no libstd implementation for single hardware, we need to skip the libstd by instructing rust to do<code>#![no_std]</code> in the first line of our code:</p><div class="highlight"><pre tabindex="0" class="chroma"><code class="language-rust" data-lang="rust"><span class="line"><span class="cl"><span class="cp">#![no_std]</span><span class="w"/></span></span><span class="line"><span class="cl"><span class="w"/></span></span><span class="line"><span class="cl"><span class="k">fn</span><span class="nf">main</span><span class="p">()</span><span class="w"/><span class="p">{</span><span class="w"/></span></span><span class="line"><span class="cl"><span class="w"/><span class="fm">println!</span><span class="p">(</span><span class="s">"Hello, world!"</span><span class="p">);</span><span class="w"/></span></span><span class="line"><span class="cl"><span class="p">}</span><span class="w"/></span></span></code></pre></div><p>The first thing we&rsquo;ll notice is that on<code>cargo build</code>, rust will immediately complain about println! not being known. Yes, that&rsquo;s true, since it&rsquo;s part of<code>libstd</code>. You might ask now what you can still use, the<a href="https://docs.rust-embedded.org/book/intro/no-std.html" target="_blank" rel="noopener">Embedded Rust Book has a really good chapter on this</a>
.</p><p>If you try to build now, you will see a couple of errors:</p><div class="highlight"><pre tabindex="0" class="chroma"><code class="language-bash" data-lang="bash"><span class="line"><span class="cl"/></span><span class="line"><span class="cl">❯ cargo run</span></span><span class="line"><span class="cl"> Compiling blink-rs v0.1.0<span class="o">(</span>/Users/ts/code/pico/blink-rs<span class="o">)</span></span></span><span class="line"><span class="cl">error: cannot find macro<span class="sb">`</span>println<span class="sb">`</span> in this scope</span></span><span class="line"><span class="cl"> --&gt; src/main.rs:4:5</span></span><span class="line"><span class="cl"><span class="p">|</span></span></span><span class="line"><span class="cl"><span class="m">4</span><span class="p">|</span> println!<span class="o">(</span><span class="s2">"Hello, world!"</span><span class="o">)</span><span class="p">;</span></span></span><span class="line"><span class="cl"><span class="p">|</span> ^^^^^^^</span></span><span class="line"><span class="cl"/></span><span class="line"><span class="cl">error:<span class="sb">`</span><span class="c1">#[panic_handler]` function required, but not found</span></span></span><span class="line"><span class="cl"/></span><span class="line"><span class="cl">error: language item required, but not found:<span class="sb">`</span>eh_personality<span class="sb">`</span></span></span><span class="line"><span class="cl"><span class="p">|</span></span></span><span class="line"><span class="cl"><span class="o">=</span> note: this can occur when a binary crate with<span class="sb">`</span><span class="c1">#![no_std]` ...</span></span></span><span class="line"><span class="cl"><span class="o">=</span> help: you may be able to compile<span class="k">for</span> a target that doesn<span class="err">'</span>t ...</span></span><span class="line"><span class="cl"/></span><span class="line"><span class="cl">error: could not compile<span class="sb">`</span>blink-rs<span class="sb">`</span> due to<span class="m">3</span> previous errors</span></span></code></pre></div><p>Obviously, println! is not available anymore, since we got rid of libstd. Additionaly, Rust does not know how to handle<code>panics</code> since the<code>#[panic_handler]</code> function is not defined anymore. And finally Rust is also not able to compile for a target where<code>eh_personality</code> (eh = exception handling) is not defined, which is in case for &ldquo;standard environments&rdquo; like linux/mac/windows automatically being done by rusts libstd.</p><h3 id="so-what-do-we-need-to-do-now-to-bring-this-code-to-a-raspberry-pi-pico">So, what do we need to do now to bring this code to a Raspberry Pi Pico?<a class="heading-anchor" href="#so-what-do-we-need-to-do-now-to-bring-this-code-to-a-raspberry-pi-pico" aria-hidden="true">#</a></h3><p>First of all, define the right target. With rust, we can install it by writing<code>rustup target install thumbv6m-none-eabi</code>.</p><p>Then, we need to tell cargo to build for this target. Instead of using<code>Cargo.toml</code>, cargo uses<code>.cargo/config.toml</code> here. So we create a<code>.cargo</code> folder and crate a file<code>config.toml</code> with the follwing contents:</p><div class="highlight"><pre tabindex="0" class="chroma"><code class="language-toml" data-lang="toml"><span class="line"><span class="cl"><span class="p">[</span><span class="nx">build</span><span class="p">]</span></span></span><span class="line"><span class="cl"><span class="nx">target</span><span class="p">=</span><span class="s2">"thumbv6m-none-eabi"</span></span></span></code></pre></div><p>Once we&rsquo;ve done this, we need to get the right crates into our system. The Embedded Rust community tries to standardize abstraction layers to streamline implementation for different board, driver and bus abstractions. These are the typical abtraction crates that we need for embedded development:</p><h4 id="architecture-support-crates">Architecture Support Crates<a class="heading-anchor" href="#architecture-support-crates" aria-hidden="true">#</a></h4><p>Our Raspberry Pi Pico runs a RP2040 Microcontroller, which is a Cortex-M implementation. So our architecture support crate is called<code>cortex-m</code> and<code>cortex-m-rt</code> (rt for runtime).</p><h4 id="peripheral-access-crate">Peripheral Access Crate<a class="heading-anchor" href="#peripheral-access-crate" aria-hidden="true">#</a></h4><p>The PAL is based on your microcontroller. By using this crate, you can access internal periphals of the chip you are using. In our case - the Raspberry Pi Pico which runs on a RP2040, so the peripheral access crate is called<code>rp2040-pac</code>.</p><h4 id="hardware-abstraction-layer">Hardware Abstraction Layer<a class="heading-anchor" href="#hardware-abstraction-layer" aria-hidden="true">#</a></h4><p>So we&rsquo;re running a Cortex-M. Good. But which cortex M? For this, we need to define the<em>Hardware Abstraction Layer</em>, which in our case is the crate called<code>rp2040-hal</code>.</p><h4 id="board-support-crate">Board Support Crate:<a class="heading-anchor" href="#board-support-crate" aria-hidden="true">#</a></h4><p>We run a Raspberry Pi Pico, so there&rsquo;s a board support crate available which is called<code>rp-pico</code>. In case you build your own hardware, usually the board support crate is what you would need to write on your own (despite your layout is 100% compatible to an existing board). The board support crates usually contain the PAC and HAL.</p><pre tabindex="0"><code>
Code │ Board │ Hardware │ Architecture │ Actual
│ Support │ Abstraction │ Support │ Hardware
│ │ ┌──────────┐ │ ┌───────────┐ │ ┌────────────────┐
│ │ │rp2040-hal│ │ │cortex-m │ │ │ │
┌───────┐ │ ┌───────┐ │ └──────────┘ │ └───────────┘ │ │ Microcontroller│
│main.rs│ │ │rp-pico│ │ │ │ │ │
└───────┘ │ └───────┘ │ ┌──────────┐ │ ┌───────────┐ │ │ rp2040 │
│ │ │rp2040-pac│ │ │cortex-m-rt│ │ │ │
│ │ └──────────┘ │ └───────────┘ │ └────────────────┘
│ │ Peripheral │ │
│ │ Access │ │
│ │ Crate │ │</code></pre><h3 id="bring-in-the-dependencies">Bring in the dependencies<a class="heading-anchor" href="#bring-in-the-dependencies" aria-hidden="true">#</a></h3><p>So, we want to add these dependencies into our project. For that, we edit the Cargo.toml file with the following contents:</p><p><code>Cargo.toml</code></p><div class="highlight"><pre tabindex="0" class="chroma"><code class="language-toml" data-lang="toml"><span class="line"><span class="cl"><span class="p">[</span><span class="nx">dependencies</span><span class="p">]</span></span></span><span class="line"><span class="cl"><span class="c"># for the cortex microcontroller</span></span></span><span class="line"><span class="cl"><span class="nx">cortex-m</span><span class="p">=</span><span class="s2">"0.7.7"</span></span></span><span class="line"><span class="cl"><span class="nx">cortex-m-rt</span><span class="p">=</span><span class="s2">"0.7.3"</span></span></span><span class="line"><span class="cl"><span class="c"># board support crate</span></span></span><span class="line"><span class="cl"><span class="nx">rp-pico</span><span class="p">=</span><span class="s2">"0.7"</span></span></span><span class="line"><span class="cl"><span class="c"># for GPIO traits</span></span></span><span class="line"><span class="cl"><span class="nx">embedded-hal</span><span class="p">=</span><span class="s2">"0.2.7"</span></span></span><span class="line"><span class="cl"><span class="c"># to handle panics</span></span></span><span class="line"><span class="cl"><span class="nx">panic-halt</span><span class="p">=</span><span class="s2">"0.2"</span></span></span></code></pre></div><h3 id="bring-in-the-code">Bring in the code<a class="heading-anchor" href="#bring-in-the-code" aria-hidden="true">#</a></h3><p>At this point, I actually planned to do write down the exact code for the embedded rust project, but then I realized that the creators of the<code>rp-pico</code> Board Support Create actually did a great job in providing a<a href="https://github.com/rp-rs/rp-hal-boards/blob/main/boards/rp-pico/examples/pico_blinky.rs" target="_blank" rel="noopener">perfectly commented blink example</a>
.<strong>Please copy the codes content to your main.rs, since we will use it for now. Some general steps through the code</strong>:</p><p>The<code>main</code> function is annotated with a<code>#[entry]</code> macro in line 41, to tell the controller where to start. At the start of the main function, you<code>take()</code> the Periphals and Coreperiphals of your controller to the currents scope ownership. This is an important concept in Rust, where<a href="https://doc.rust-lang.org/book/ch04-01-what-is-ownership.html" target="_blank" rel="noopener">ownership of a value/variable is always clear</a>
.</p><p>Then, you setup a watchdog and clocks, get a delay functionality from the cortex&rsquo;s hardware implementation and some other I/O structures. Finally, you end up in the<code>loop</code>, which in rust is equal to a<code>while(1)</code> in C or the<code>loop()</code> function in Arduino.</p><div class="highlight"><pre tabindex="0" class="chroma"><code class="language-rust" data-lang="rust"><span class="line"><span class="cl"><span class="c1">// Blink the LED at 1 Hz</span></span></span><span class="line"><span class="cl"><span class="k">loop</span><span class="w"/><span class="p">{</span><span class="w"/></span></span><span class="line"><span class="cl"><span class="w"/><span class="n">led_pin</span><span class="p">.</span><span class="n">set_high</span><span class="p">().</span><span class="n">unwrap</span><span class="p">();</span><span class="w"/></span></span><span class="line"><span class="cl"><span class="w"/><span class="n">delay</span><span class="p">.</span><span class="n">delay_ms</span><span class="p">(</span><span class="mi">500</span><span class="p">);</span><span class="w"/></span></span><span class="line"><span class="cl"><span class="w"/><span class="n">led_pin</span><span class="p">.</span><span class="n">set_low</span><span class="p">().</span><span class="n">unwrap</span><span class="p">();</span><span class="w"/></span></span><span class="line"><span class="cl"><span class="w"/><span class="n">delay</span><span class="p">.</span><span class="n">delay_ms</span><span class="p">(</span><span class="mi">500</span><span class="p">);</span><span class="w"/></span></span><span class="line"><span class="cl"><span class="p">}</span><span class="w"/></span></span></code></pre></div><p>In this code, we blink the LED once a second.</p><h3 id="build-the-code">Build the Code<a class="heading-anchor" href="#build-the-code" aria-hidden="true">#</a></h3><p>In Rust, building code is pretty simple, you just type<code>cargo build</code> or<code>cargo build --release</code>. We build the release code. You should find a file in<code>target/thumbv6m-none-eabi/release/</code> called<code>blink-rs</code>. This is an ELF file, which you cannot just load to your RP2040 now.</p><p>There&rsquo;s a tool called<code>elf2uf2</code> you can install with<code>cargo install elf2uf2-rs</code>. With this, you can translate the file (after you reload the terminal):</p><pre tabindex="0"><code>elf2uf2-rs target/thumbv6m-none-eabi/release/blink-rs</code></pre><p>Wait, there&rsquo;s an error?</p><pre tabindex="0"><code>Error: "Memory segment 0x010000-&gt;0x010094 is outside of valid address range for device"</code></pre><p>Okay, it seems that the compiler did something wrong and used more memory than the pico is available to give to us.<a href="https://github.com/rp-rs/rp-hal/issues/307#issuecomment-1058952616" target="_blank" rel="noopener">Googling</a>
tells us that we need to specify a memory.x file which is used by the linker to guarantee a correct output layout for a raspberry pi pico. So let&rsquo;s take a look at what is happening here:</p><p><code>memory.x</code></p><pre tabindex="0"><code>MEMORY {
BOOT2 : ORIGIN = 0x10000000, LENGTH = 0x100
FLASH : ORIGIN = 0x10000100, LENGTH = 2048K - 0x100
RAM : ORIGIN = 0x20000000, LENGTH = 256K
}
EXTERN(BOOT2_FIRMWARE)
SECTIONS {
/* ### Boot loader */
.boot2 ORIGIN(BOOT2) :
{
KEEP(*(.boot2));
} &gt; BOOT2
} INSERT BEFORE .text;</code></pre><p>This is a so called<em>Linker Script</em> for the ld linker which is part of the Gnu Compiler Collection (gcc).
What it is basically doing is defining boot, flash and ram locations in memory and then making sure that the BOOT2 section is kept where it already is.</p><p>Comparing this and the Memory Segment error from the elf2uf2-rs tool, I&rsquo;m pretty happy that we were notified about invalid adress memory, because it seems that we would&rsquo;ve overwritten the huge parts of the existing bootloader.
Good, so we create a new file at the project root level called<code>memory.x</code> with the contents mentioned above, and change the<code>.cargo/config.toml</code> to include:</p><div class="highlight"><pre tabindex="0" class="chroma"><code class="language-toml" data-lang="toml"><span class="line"><span class="cl"><span class="p">[</span><span class="nx">target</span><span class="p">.</span><span class="nx">thumbv6m-none-eabi</span><span class="p">]</span></span></span><span class="line"><span class="cl"><span class="nx">rustflags</span><span class="p">=</span><span class="p">[</span></span></span><span class="line"><span class="cl"><span class="s2">"-C"</span><span class="p">,</span><span class="s2">"link-arg=-Tlink.x"</span><span class="p">,</span></span></span><span class="line"><span class="cl"><span class="p">]</span></span></span><span class="line"><span class="cl"/></span><span class="line"><span class="cl"><span class="p">[</span><span class="nx">build</span><span class="p">]</span></span></span><span class="line"><span class="cl"><span class="nx">target</span><span class="p">=</span><span class="s2">"thumbv6m-none-eabi"</span></span></span></code></pre></div><p>Now, run<code>cargo clean</code> and<code>cargo build --release</code> followed by once more<code>elf2uf2-rs target/thumbv6m-none-eabi/release/blink-rs</code>. If you see no error, boot your Raspberry Pi Pico into bootloader mode by attaching microusb while pressing<code>BOOTSEL</code> button on the board. Now rerun the last command with a -d at the end to flash the device and see your Raspberry Pi Pico blinking!<strong>Great job!</strong></p><p>You can find the repository in<a href="https://github.com/tsmt09/blink-rs" target="_blank" rel="noopener">my github</a>
.</p><h3 id="where-to-go-from-here">Where to go from here?<a class="heading-anchor" href="#where-to-go-from-here" aria-hidden="true">#</a></h3><p>So we made it work to blink a LED on a Raspberry Pi Pico using Rust. That&rsquo;s great. From here you can basically go everywhere. Good learning resources for embedded rust you can find here:</p><ul><li><a href="https://github.com/rust-embedded/awesome-embedded-rust" target="_blank" rel="noopener">Awesome Embedded Rust</a></li><li><a href="https://rust-embedded.github.io/discovery" target="_blank" rel="noopener">Embedded Discovery Book</a></li><li><a href="https://github.com/rp-rs/rp-hal-boards/tree/main/boards/rp-pico" target="_blank" rel="noopener">RP Pico Crate with great examples</a></li></ul><p>You can find the source for this code in
Thank you for reading through this. If you have any questions or feedback for things I can do better, feel free to send me an email to<code>hi@tobischmitt.net</code>.</p></content></entry><entry><title>Debugging RPi Pico W with Picoprobe and GDB</title><link href="http://blog.koenig.diy/debugging_with_picoprobe/" rel="alternate" type="text/html"/><id>http://blog.koenig.diy/debugging_with_picoprobe/</id><published>2023-03-18T14:10:16+01:00</published><updated>2023-03-18T14:10:16+01:00</updated><summary>Learn how to debug a Raspberry Pi Pico by using another Raspberry Pi Pico and GDB.</summary><content type="html"><p>Did you ever wonder how to debug a microcontroller? With a Raspberry Pi Pico there&rsquo;s a simple solution:<strong>Use another Raspberry Pi Pico</strong> 😉!</p><p>What I worked on today is being able to prepare two Raspberry Pi Picos (one W and one without W) to debug executables. The one without Wifi will be used as a<a href="https://github.com/raspberrypi/picoprobe" target="_blank" rel="noopener">Picoprobe</a>
, the WiFi version as target later.</p><p><figure><img src="/debugging_with_picoprobe/2023-03-18_wired_picos.jpg" width="1024" height="768" srcset="/debugging_with_picoprobe/2023-03-18_wired_picos_hu_7ddd2b6552e2a06d.jpg 480w, /debugging_with_picoprobe/2023-03-18_wired_picos_hu_f888b2e508e877c5.jpg 1024w" loading="lazy" alt="Wiring up Raspeberry Picos"/></figure></p><h2 id="prerequisites">Prerequisites<a class="heading-anchor" href="#prerequisites" aria-hidden="true">#</a></h2><ul><li>if not already done,<a href="https://brew.sh" target="_blank" rel="noopener">install Homebrew</a></li><li>install a serial terminal. My recommendation is<a href="https://coolterm.en.lo4d.com/windows" target="_blank" rel="noopener">CoolTerm</a></li></ul><h2 id="building-openocd">Building openocd<a class="heading-anchor" href="#building-openocd" aria-hidden="true">#</a></h2><p><a href="https://datasheets.raspberrypi.com/pico/getting-started-with-pico.pdf" target="_blank" rel="noopener">In Raspberry Pi Pico&rsquo;s Getting Started Document</a>
, they have a great explanation of how to build openocd (which is an open sourced on-chip debugger) and picoprobe. I will note down the Mac commands here, if you are on a different system please consult the linked Document:</p><div class="highlight"><pre tabindex="0" class="chroma"><code class="language-bash" data-lang="bash"><span class="line"><span class="cl"><span class="c1"># install dependencies</span></span></span><span class="line"><span class="cl">brew install libtool automake libusb wget pkg-config gcc texinfo</span></span><span class="line"><span class="cl"><span class="c1"># create a pico directory whereever you like and navigate there</span></span></span><span class="line"><span class="cl">mkdir -p ~/pico</span></span><span class="line"><span class="cl"><span class="c1"># clone openocd</span></span></span><span class="line"><span class="cl">git clone https://github.com/raspberrypi/openocd.git --branch rp2040 --depth<span class="o">=</span><span class="m">1</span></span></span><span class="line"><span class="cl"><span class="nb">cd</span> openocd</span></span><span class="line"><span class="cl"><span class="c1"># export tex path</span></span></span><span class="line"><span class="cl"><span class="nb">export</span><span class="nv">PATH</span><span class="o">=</span><span class="s2">"/usr/local/opt/texinfo/bin:</span><span class="nv">$PATH</span><span class="s2">"</span><span class="sb">`</span></span></span><span class="line"><span class="cl"><span class="c1"># run bootstrapping script</span></span></span><span class="line"><span class="cl">./bootstrap</span></span><span class="line"><span class="cl"><span class="c1"># run config script</span></span></span><span class="line"><span class="cl">./configure --disable-werror</span></span><span class="line"><span class="cl"><span class="c1"># build</span></span></span><span class="line"><span class="cl">make -j4</span></span><span class="line"><span class="cl"><span class="c1"># test</span></span></span><span class="line"><span class="cl">src/openocd</span></span></code></pre></div><p>You should see this output:</p><pre tabindex="0"><code>Open On-Chip Debugger 0.10.0+dev-gc231502-dirty (2020-10-15-07:48)
Licensed under GNU GPL v2
For bug reports, read
http://openocd.org/doc/doxygen/bugs.html
embedded:startup.tcl:56: Error: Can't find openocd.cfg
in procedure 'script'
at file "embedded:startup.tcl", line 56
Info : Listening on port 6666 for tcl connections
Info : Listening on port 4444 for telnet connections
Error: Debug Adapter has to be specified, see "interface" command
embedded:startup.tcl:56: Error:
in procedure 'script'
at file "embedded:startup.tcl", line 56</code></pre><p>It works? Good!</p><h2 id="download-and-setup-pico-sdk">Download and setup pico-sdk<a class="heading-anchor" href="#download-and-setup-pico-sdk" aria-hidden="true">#</a></h2><div class="highlight"><pre tabindex="0" class="chroma"><code class="language-bash" data-lang="bash"><span class="line"><span class="cl"><span class="c1"># navigate back to your pico directory</span></span></span><span class="line"><span class="cl"><span class="c1"># clone picoprobe and install submodules</span></span></span><span class="line"><span class="cl">git clone https://github.com/raspberrypi/pico-sdk.git</span></span><span class="line"><span class="cl"><span class="nb">cd</span> pico-sdk</span></span><span class="line"><span class="cl">git submodule update --init</span></span></code></pre></div><h2 id="building-picoprobe">Building picoprobe<a class="heading-anchor" href="#building-picoprobe" aria-hidden="true">#</a></h2><div class="highlight"><pre tabindex="0" class="chroma"><code class="language-bash" data-lang="bash"><span class="line"><span class="cl"/></span><span class="line"><span class="cl"><span class="c1"># navigate back to your pico directory</span></span></span><span class="line"><span class="cl"><span class="c1"># clone picoprobe and install submodules</span></span></span><span class="line"><span class="cl">git clone https://github.com/raspberrypi/picoprobe.git</span></span><span class="line"><span class="cl"><span class="nb">cd</span> picoprobe</span></span><span class="line"><span class="cl">git submodule update --init</span></span><span class="line"><span class="cl"><span class="c1"># create build dir and switch</span></span></span><span class="line"><span class="cl">mkdir build<span class="o">&amp;&amp;</span><span class="nb">cd</span> build</span></span><span class="line"><span class="cl"><span class="c1"># setup build files</span></span></span><span class="line"><span class="cl"><span class="nv">PICO_SDK_PATH</span><span class="o">=</span>../../pico-sdk cmake ..</span></span><span class="line"><span class="cl"><span class="c1"># build</span></span></span><span class="line"><span class="cl">make -j4</span></span></code></pre></div><p>If everything went well, you see a file called<code>picoprobe.uf2</code> in your current directory.</p><h2 id="building-the-pico-examples">Building the pico examples<a class="heading-anchor" href="#building-the-pico-examples" aria-hidden="true">#</a></h2><div class="highlight"><pre tabindex="0" class="chroma"><code class="language-bash" data-lang="bash"><span class="line"><span class="cl"><span class="c1"># navigate back to your pico directory</span></span></span><span class="line"><span class="cl"><span class="c1"># clone picoprobe and install submodules</span></span></span><span class="line"><span class="cl">git clone https://github.com/raspberrypi/pico-examples.git</span></span><span class="line"><span class="cl"><span class="nb">cd</span> pico-examples</span></span><span class="line"><span class="cl"><span class="c1"># create build folder and navigate</span></span></span><span class="line"><span class="cl">mkdir build<span class="o">&amp;&amp;</span><span class="nb">cd</span> build</span></span><span class="line"><span class="cl"><span class="c1"># setup build files using PICO_SDK_PATH env var and CMAKE_BUILD_TYPE compiler parameter, IMPORTANT!</span></span></span><span class="line"><span class="cl"><span class="nv">PICO_SDK_PATH</span><span class="o">=</span>../pico-sdk cmake -DCMAKE_BUILD_TYPE<span class="o">=</span>Debug ..</span></span><span class="line"><span class="cl"><span class="c1"># build hello serial:</span></span></span><span class="line"><span class="cl"><span class="nb">cd</span> hello_world/serial</span></span><span class="line"><span class="cl">make -j4</span></span></code></pre></div><p>Make sure you can see a<code>hello_serial.elf</code> file in your current directory.</p><h2 id="wiring-up-the-two-picos">Wiring up the two Picos<a class="heading-anchor" href="#wiring-up-the-two-picos" aria-hidden="true">#</a></h2><p>Nothing as simple as an image:</p><p><figure><img src="/debugging_with_picoprobe/2023-03-18_wiring_picos.png" width="912" height="596" srcset="/debugging_with_picoprobe/2023-03-18_wiring_picos_hu_5d3d5437c85ddafa.png 480w, /debugging_with_picoprobe/2023-03-18_wiring_picos_hu_1c5d0bdcbe4f608e.png 912w" loading="lazy" alt="Wiring up Raspeberry Picos"/></figure><em>(image taken from the linked<a href="https://datasheets.raspberrypi.com/pico/getting-started-with-pico.pdf" target="_blank" rel="noopener">Getting Started Document</a>
)</em></p><p>The pico on the left using the yellow USB cable is your debugging<code>picoprobe</code>.<strong>Yellow</strong> and<strong>orange</strong> are for serial passthrough,<strong>teal</strong> and<strong>purple</strong> are for the Debug bus.</p><h2 id="flashing-picoprobe">Flashing Picoprobe<a class="heading-anchor" href="#flashing-picoprobe" aria-hidden="true">#</a></h2><p>When attaching a USB Cable to your Picoprobe-Pico, hold down the<code>BOOTSEL</code> button on the board to make the Pico run in bootloader mode. On your mac you should see a external volume popping up with the name<code>RPI-RP2</code>. Copy the picoprobe software over and the device will restart automatically.</p><div class="highlight"><pre tabindex="0" class="chroma"><code class="language-bash" data-lang="bash"><span class="line"><span class="cl"><span class="nb">cd</span> ~/pico/picoprobe</span></span><span class="line"><span class="cl">cp picoprobe.elf /Volumes/RPI-RP2/</span></span></code></pre></div><h2 id="finally-debugging">Finally, Debugging!<a class="heading-anchor" href="#finally-debugging" aria-hidden="true">#</a></h2><p>Now, open<strong>another terminal</strong><em>[T2]</em> and navigate to<code>~/pico/openocd</code>. To start the on-chip debugger service, run:</p><div class="highlight"><pre tabindex="0" class="chroma"><code class="language-bash" data-lang="bash"><span class="line"><span class="cl">src/openocd -f interface/cmsis-dap.cfg -c<span class="s2">"adapter speed 5000"</span> -f target/rp2040.cfg -s tcl</span></span></code></pre></div><p>At the end of the output you should read:<code>Listening on port 3333 for gdb connections</code>. Yes? good!</p><p>Now, switch back to the terminal which you used to build 3 steps before<em>[T1]</em>, and run<code>arm-none-eabi-gdb</code> with the<code>hello_serial.elf</code> build file. This will connect to the on-chip debugger port you just opened and use the<code>hello_serial.elf</code> build for debugging.</p><div class="highlight"><pre tabindex="0" class="chroma"><code class="language-bash" data-lang="bash"><span class="line"><span class="cl">arm-none-eabi-gdb -q -ex<span class="s2">"target extended-remote :3333"</span> hello_serial.elf</span></span></code></pre></div><p>You should be able to see GDB output now.</p><pre tabindex="0"><code>❯ arm-none-eabi-gdb -q -ex "target extended-remote :3333" hello_serial.elf
Reading symbols from hello_serial.elf...
Remote debugging using :3333
warning: multi-threaded target stopped without sending a thread-id, using first non-exited thread
time_reached (t=...) at /Users/ts/code/pico/pico-sdk/src/rp2_common/hardware_timer/include/hardware/timer.h:116
116 uint32_t hi_target = (uint32_t)(target &gt;&gt; 32u);</code></pre><p>In<em>[T1]</em>, tell GDB to load the binary file to the remote pico by writing<code>load</code> into the gdb terminal:</p><pre tabindex="0"><code>(gdb) load
Loading section .boot2, size 0x100 lma 0x10000000
Loading section .text, size 0x44e8 lma 0x10000100
Loading section .rodata, size 0xfb4 lma 0x100045e8
Loading section .binary_info, size 0x28 lma 0x1000559c
Loading section .data, size 0x244 lma 0x100055c4
Start address 0x100001e8, load size 22536
Transfer rate: 16 KB/sec, 3756 bytes/write.</code></pre><p>In the openocd<em>[T2]</em> Terminal you should see this output repeatedly, while the .elf file is loaded to the target chip:</p><pre tabindex="0"><code>target halted due to debug-request, current mode: Thread
xPSR: 0xf1000000 pc: 0x000000ea msp: 0x20041f00</code></pre><p>Okay, perfect, switch back to<em>[T1]</em>, and place a breakpoint to<code>hello_serial.c:14</code>:</p><pre tabindex="0"><code>(gdb) b hello_serial.c:14
Breakpoint 1 at 0x10000310: file /Users/ts/code/pico/pico-examples/hello_world/serial/hello_serial.c, line 14.
Note: automatically using hardware breakpoints for read-only addresses.</code></pre><p>Open your Terminal software, connect to your usb attached<code>picoprobe</code> with settings BAUD 115200 8-N-1:</p><p><figure><img src="/debugging_with_picoprobe/2023-03-18_coolterm_settings.png" width="628" height="298" srcset="/debugging_with_picoprobe/2023-03-18_coolterm_settings_hu_1d81bd3e5c79da60.png 480w, /debugging_with_picoprobe/2023-03-18_coolterm_settings_hu_ae14b51dada145a5.png 628w" loading="lazy" alt="Coolterm Settings"/></figure></p><p>Switch back to your GDB<em>[T1]</em> and run the software. For this, just type<code>r</code> and press<code>ENTER</code>. GDB will ask you if it should start the software from the beginning. Write yes. Now you should see the following output since you run into a breakpoint:</p><pre tabindex="0"><code>(gdb) r
The program being debugged has been started already.
Start it from the beginning? (y or n) y
Starting program: /Users/ts/code/pico/pico-examples/hello_world/serial/hello_serial.elf
target halted due to debug-request, current mode: Thread
xPSR: 0x01000000 pc: 0x00000184 msp: 0x20041f00
[New Thread 2]
Thread 1 hit Breakpoint 1, main () at /Users/ts/code/pico/pico-examples/hello_world/serial/hello_serial.c:14
14 sleep_ms(1000);</code></pre><p>In CoolTerm, you should see a<code>Hello World!</code> output. If this is the case, everything worked fine! In case you are not familiar with GDB debugging, I can just recommend<a href="https://darkdust.net/files/GDB%20Cheat%20Sheet.pdf" target="_blank" rel="noopener">this GDB cheat sheet</a>
. Some short commands:</p><ul><li><code>r</code> for RUN the program, ctrl+c to stop the program</li><li><code>l</code> to print the code where you currently are</li><li><code>b [filename]:[line]</code> to set a breakpoint</li><li><code>c</code> to continue until the next breakpoint</li><li><code>n</code> to step to the next instruction</li></ul><p><strong>Congrats, you can now do on-chip debugging on a Raspberry Pi Pico by using another Raspberry Pi Pico.</strong></p></content></entry></feed>